

INTRODUCTION
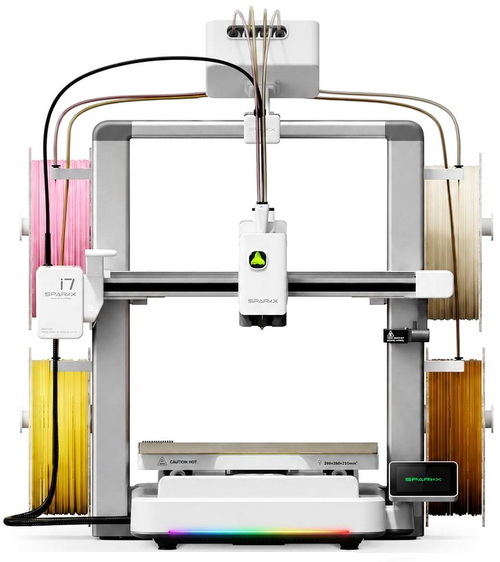
Desktop 3D printers continue to advance at a pace that reshapes what creators can realistically produce at home or in small studios. Each new generation brings improvements in motion stability, thermal consistency, and filament handling, key factors that determine whether a print comes out clean, strong, and dimensionally accurate. As these machines evolve, they’re becoming capable of working with materials that once demanded industrial‑grade setups, from reinforced composites to perature‑sensitive engineering filaments. This steady progress has turned 3D printers into reliable tools for refining prototypes, fabricating custom parts, and experimenting with specialty materials without needing a dedicated workshop. Better temperature control, smarter extrusion systems, and sturdier frames all contribute to a smoother, more predictable printing experience. Against that backdrop, we’re examining a user friendly model designed to deliver stable performance and composite‑ready extrusion, the Creality SPARKX i7 AI combined with the Nano CFS extra.
Shenzhen Creality 3D Technology Co., Ltd., known as Creality, is a world-leading brand of consumer 3D printers. Since our establishment in 2014, we have embraced our role as an "3D Printing Evangelist" committed to the innovation, application, and popularization of 3D printing technology worldwide. Our forward-looking business strategy, termed "One Core with Two Wings," has propelled our rapid growth. Specifically, 3D printer products are at the “Core” of our business, which is assisted by the first “Wing” of ecosystem products like 3D scanners, laser engravers, filaments, and accessories. A second “Wing” of our business is Creality Cloud, an all-in-one 3D printing platform that gathers 3D models and enables a cloud printing experience.
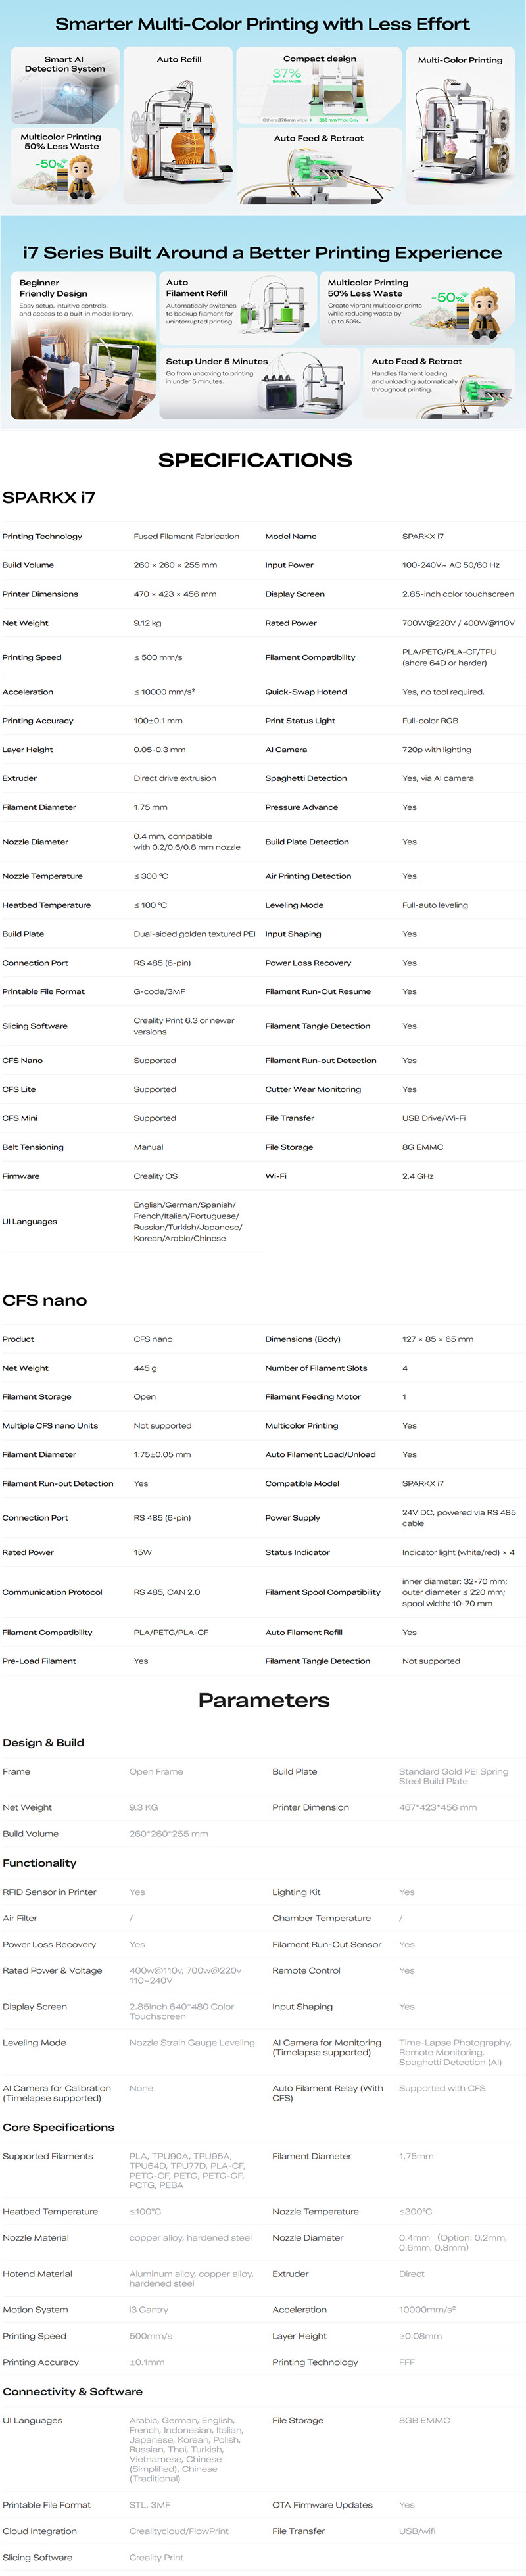
The SPARKX i7 AI is built as a fully‑automated, multi‑color‑ready FFF 3D printer with a feature stack that goes far beyond typical consumer machines, and both the official product page and the attached spec sheet reinforce how unusually integrated its systems are. Its motion platform supports acceleration up to 10000mm/s², paired with an all‑gear extruder and a hardened‑steel/copper‑alloy hotend capable of reaching 300°C, giving it the thermal headroom for PLA, PETG, ABS and other engineering‑grade materials. The build volume sits at 200x200x200mm, wrapped in a compact open‑frame chassis weighing 9.5kg, with a dual‑sided golden‑textured PEI plate for reliable adhesion and easy part release. Its automation suite is unusually dense, Air Printing Detection, Filament Run‑Out Detection, Filament Tangle Detection, Auto Resume, Auto Feed & Restart, and a full Auto Refill system that works in tandem with the CFS nano. The printer’s 720p AI camera monitors print progress, while the RFID sensor and lighting kit support guided filament management. The SPARKX i7 AI also features an 2.85-inch color touchscreen and as for connectivity it's equally robust—RJ45, RS485, CAN 2.0, USB, and Wi‑Fi with OTA firmware updates, 8GB EMMC onboard storage, and compatibility with Creality Print for slicing and remote control. As for the CFS nano itself, it's a compact 4‑slot filament hub designed exclusively for the SPARKX i7 AI, supporting spools from 67–200mm diameter and 32–70mm width, with its own run‑out detection, tangle detection, auto refill, and RS485/CAN communication. It enables seamless multi‑color printing without manual intervention, feeding the printer automatically and restarting extrusion when needed. Together, the SPARKX i7 AI and CFS nano form a tightly integrated platform focused on automation, stability, and multi‑material convenience, an ecosystem built to minimize user effort while maximizing print reliability.
SPECIFICATIONS AND FEATURES
PACKAGING AND CONTENTS

The SPARKX i7 AI is shipped inside a small box that just has a sticker with a picture of the printer at the front.

Serial numbers, barcodes, warning labels and contact information for Creality are all located on both sides.

The printer and its bundle are placed inside three thick pieces of foam.

Along with the SPARKX i7 3D printer inside the box you'll find its power cord, dual sided golden textured PEI plate, Hyper PLA test filament, 2-piece filament holder, PTFE tube, two bags with screws, two Allen keys, scraper, several stickers, after-sales service guide, creality cloud card, disclaimer and safety guidelines card and the user manual.
THE SPARKX I7 AI

Just like with every other open frame 3D printer the SPARKX i7 AI comes in two pieces the top of which is painted silver, grey and white.


The extruder assembly features a white cover made of plastic, 3 fans (top, right and bottom) and 4 filament entries at the top.

Removing the cover reveals the quick-release mechanism for the hotend.

An 720p AI camera with a privacy cover and 2 LEDs is placed on the left side as seen above.

The base is mostly painted white (some will like this, others will not).

The dual sided golden textured PEI plate is as always magnetically attached onto the hotbed.

On the left side we find the nano/CFS port and a USB 2.0 port.
 Moving to the right we find the 2.85-inch color touchscreen which can turn all the way to the front as seen above (fixed angle).


Turning the base over we find the top mounting area and a compartment for all of the cables.
ASSEMBLY

Attaching both pieces of the SPARKX i7 AI is very easy, just pass the bottom through the top as seen above.


Next you will need to use the 10 large screws in the bundle to secure both pieces.

After that you will need to route and attach all cables in the compartment underneath.

Forgot to mention that this piece on the left acts as an stop mechanism.

Last step is to mount the 2-piece spool holder at the top.

For people who've bought the standalone SPARKX i7 AI this is the end result.
NANO CFS KIT

The nano CFS kit arrives inside a small box that just has a sticker at the front with the name of the product.

Everything is nicely packed between three pieces of foam.

The nano CFS kit consists of 14 pieces and as expected we also get the CFS connection cable along with several PTFE tubes.

I started installation by mounting the main unit on top on the SPARKX i7 AI (where the filament holder was).

Next were the rear filament feet mounts.

After that you will need to attach the filament holders onto the feet and attach the feet onto the printer (tool-less slide mechanism).

Of course, you will need to attach the PTFE tubes (long tubes for the 1/4 filament positions, short for the 2/3) and place the filaments as seen above.

Also worth pointing out is that unlike other models the RGB LED bar is not placed at the front of the hotbed but at the lower end of the base.
DISPLAY MENUS


As usual once you power up the SPARKX i7 AI for the first time it will ask you to choose language, remove the transport brackets and any obstructions, connect it to the internet (Wi-Fi) and allow it to run a self-check.

After these steps are completed, the printer will check for available firmware updates and if any it will notify you.


The main tab is mostly the same as with past models so from here you can choose to start printing any of the models stored on its memory or on the USB drive, adjust temperature of the heat bed and hotend, adjust printing speed, enable night mode (less noise, increases print time), turn on/off the 2 LEDs of the 720p AI camera and adjust cooling fan speed.


You can also access the filament and X/Y/Z control tabs.


Inside the print settings tab you'll find settings for the RGB light strip, sound effects, nano CFS, feedback, nozzle, AI detection and expert mode.


Moving to the system settings tab here you can access the WLAN, my device (information), firmware (updates), screen brightness, screen off timer, language, root account and can also perform a factory reset.

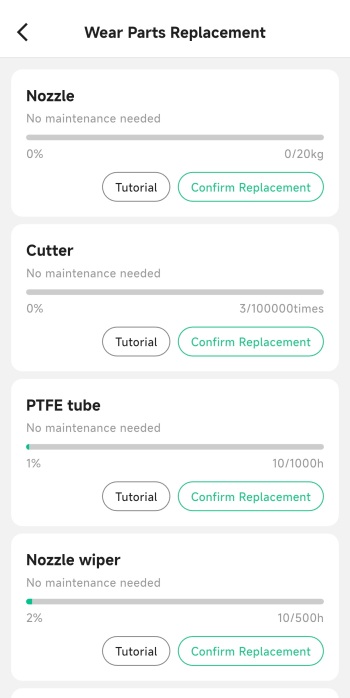
Typically, inside the maintenance tab you'll find the calibration tab along with tabs for routine maintenance and replacement of consumables.
CREALITY CLOUD APP
For extra control over your Creality 3D printer you should download the Creality Cloud app.
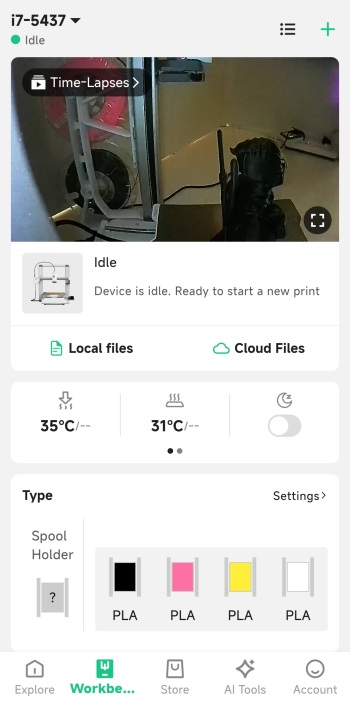
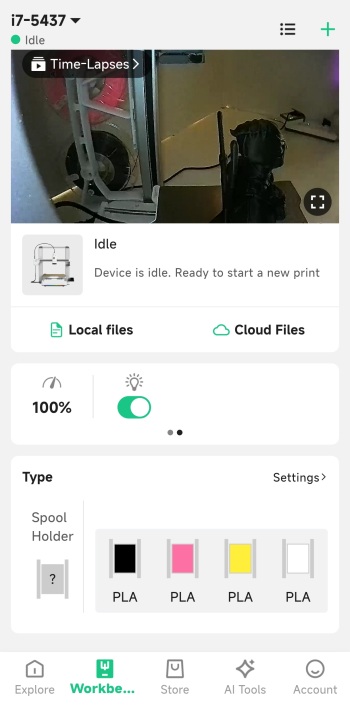
From inside the app you can watch what is being printed live, check the timelapse (once complete), control the printer (stop/pause), check temperatures, adjust speed, enable/disable the LED, adjust fan speeds, control the axis and the bed and check the status of the installed filaments.
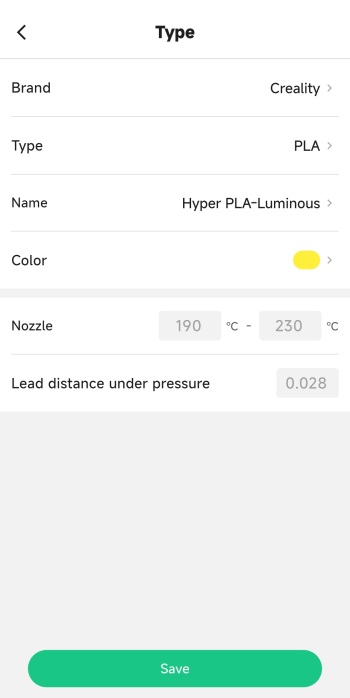
You can also manually adjust the filament type by pressing on each.
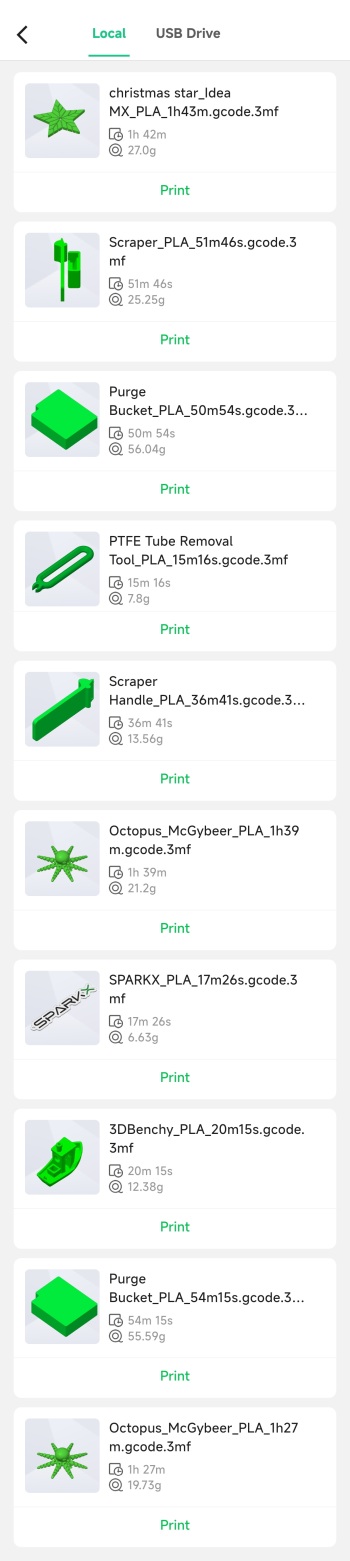
Printing one of the many pre-loaded models or your very own mounted on the USB is also done from inside the app.
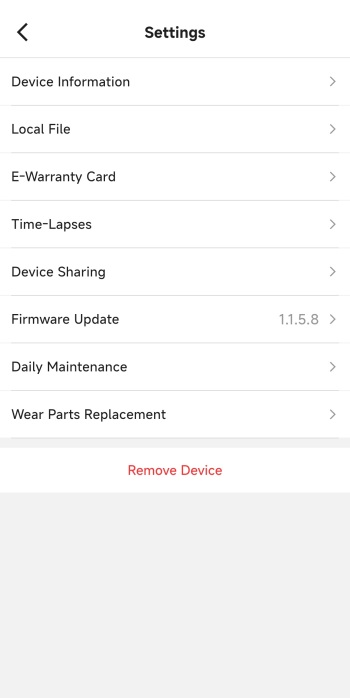
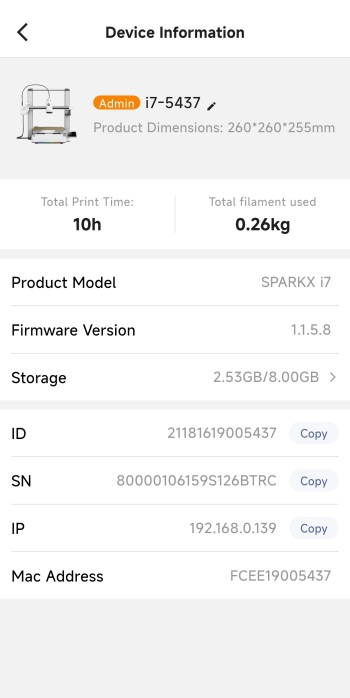
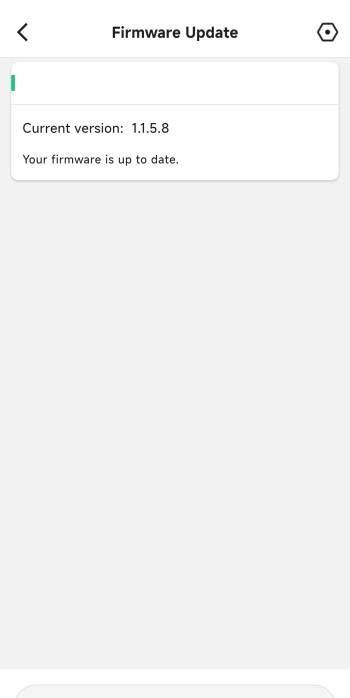
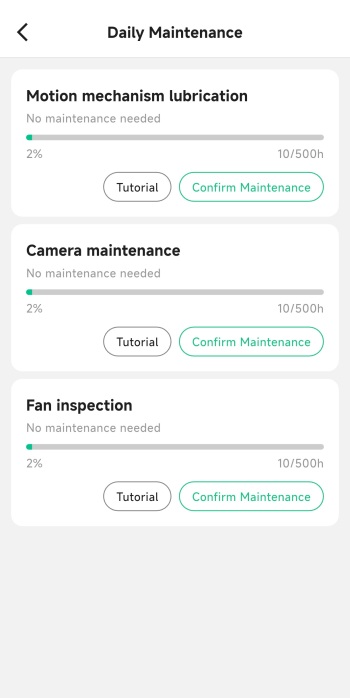
The settings tab contains your electronic insurance card and allows you to access information of the printer, share the printer with others, check local files and time lapses and check for firmware updates.
TESTING METHODOLOGY
Once again to test this printer by Creality I used their latest print software (Creality Print v7.2.2.5483) by manually entering the same settings I’ve used to date with all FDM printers (quality of 0.16mm, 20% infill density and cubic infill pattern).
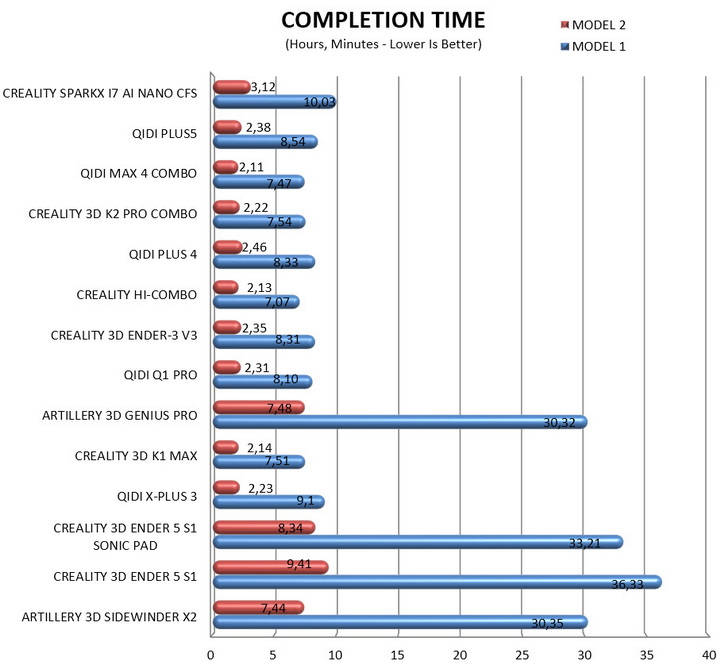
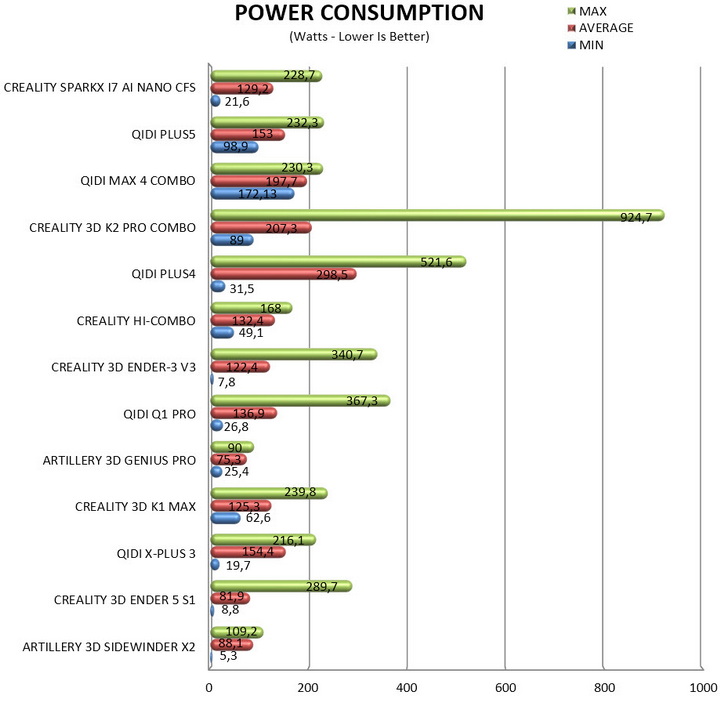
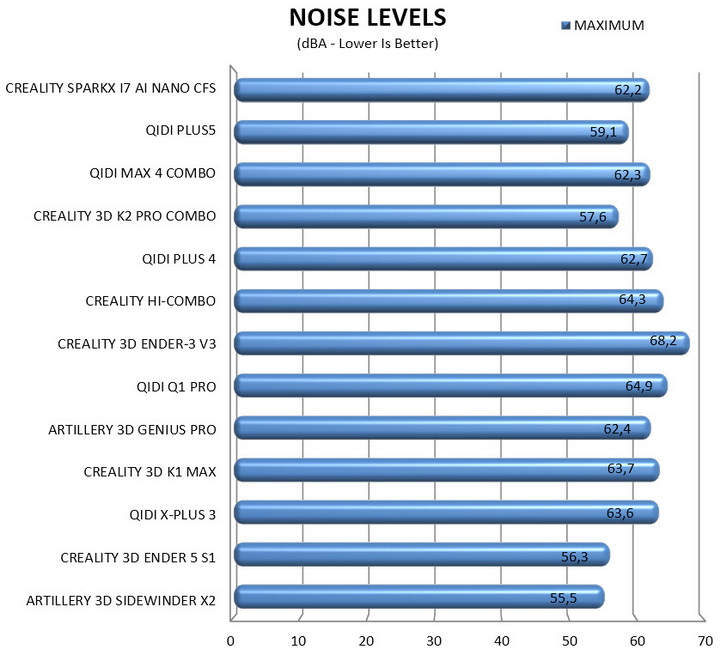
Nothing else has changed of course so again I’ll be using 2 different sized models (downloaded from Cults3D / member Eastman) to record completion time at 100% speed. Second thing to test are noise levels and so once again I’ll be using my ExTech HD600 decibel meter placed roughly 30cm away to record the maximum noise coming from the 3D printer while printing. As for the 3rd test with the help of an UPS and two power meters I decided to also record not only the lowest and highest but also the average instant power consumption of the 3D printer in my hands.


Since the SPARKX i7 AI is primarily aimed for home use it’s far from the fastest model, still in terms of print quality, even at full speed, it does very well as evident from the above picture (as usual a timelapse of this model is available both on TikTok and YouTube).

The good news is that when printing a multi-color 3D model discarded filament is less compared to previous models (not by a lot sure but it is).
TEST RESULTS
CONCLUSION
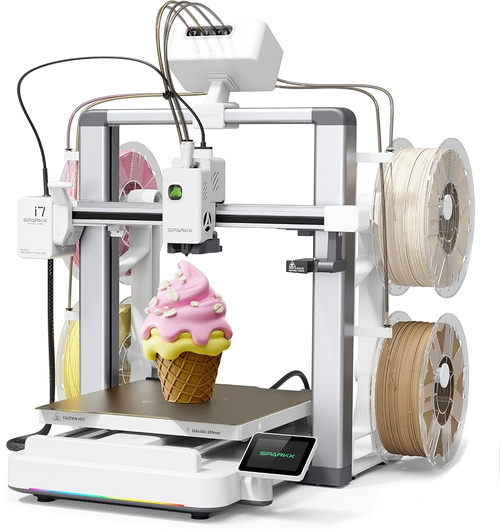
The SPARKX i7 and Nano CFS combo packs an impressive amount of functionality into a small, stylish package. You get multi‑color printing without needing a bulky external unit, fast print speeds that keep projects moving, and a quick‑release hotend that makes nozzle swaps refreshingly simple. The built‑in 720p AI camera adds real convenience for monitoring prints while the inclusion of a physical privacy cover is a thoughtful touch for anyone who prefers extra control over when the camera is active (unfortunately even with direct IP access, the SPARKX i7 exposes no camera configuration endpoints. The MJPEG stream on port 8000 cannot be modified, and even advanced tools cannot access or change the camera resolution). On the other hand, the Nano CFS’s clip‑on mounting could be sturdier, and the "almost" all‑white look of both the printer and the Nano CFS is a matter of personal taste, but the overall experience feels modern, compact, and genuinely enjoyable. It’s a setup that encourages creativity while staying easy to manage, making it a compelling choice for anyone who wants multi‑color capability in a tight footprint.
Right now, the SPARKX i7 AI 3D printer with the nano CFS kit by Creality retails for USD299.99 inside the USA (Amazon.com) and for 299Euros inside the EU (store.creality.com) a price tag which is quite tempting for such a model. Overall, the SPRAKX i7 AI delivers where it matters, multi-color printing with the nano CFS addon, good speed and equally good print quality. Yes, it’s not perfect and the nano CFS kit is not as steady/stable as the standalone CFS devices but it does deliver as advertised so the Golden Award is in order.

PROS
- Good Build Quality
- Fast (Up To 500ms Speed / 10000ms Acceleration)
- Nano CFS Kit (4 Filaments)
- Print Quality
- Heated Print Bed
- High Speed Direct Drive Extruder
- G Sensor (Input Shaping)
- Manual & Automatic Leveling
- Quick Release Hotend
- 2.85 Inch Color Touchscreen
- WiFi & USB Port
- Power Consumption
CONS
- 720p Camera & Small LED Light (Subpar Timelapse Quality)
- Relatively Small Build Plate (For Some)
- Nano CFS Kit (Stability)