O-Sense


INTRODUCTION
Summer is by far the worst season for PC users due to the rather above-normal temperatures and as a matter of fact while i type these lines the CPU of my system has hit 45 degrees Celsius at a virtually idle state (to be completely fair however the AC is turned off and the fans are set at 50% speed). So because we are well aware that during this season many gamers, enthusiasts and even professionals are out in the market looking for the best possible cooling solutions every summer we do our best to deliver reviews of some of the latest water cooling kits (custom loops) to get released. XSPC is one of the oldest water cooling component manufacturers in the world and so today we're taking a look at one of their latest products the RayStorm Pro X4 Photon AX360 WaterCooling Kit.
As gaming and overclocking enthusiasts, we started XSPC over 14 years ago with the vision of offering world-class cooling products that don’t sacrifice reliability or quiet operation in the pursuit of ultimate cooling performance. Today, our product range has expanded to include everything you need to build the ultimate liquid cooling system, from water blocks, radiators and reservoirs to fixtures and fittings. Every component we create at XSPC is engineered to the highest standards with the highest quality materials, and delivers market-leading performance without sacrificing reliability. As XSPC continues to grow, we remain totally focused on our original values and vision - creating water cooling components with superior performance and reliability.
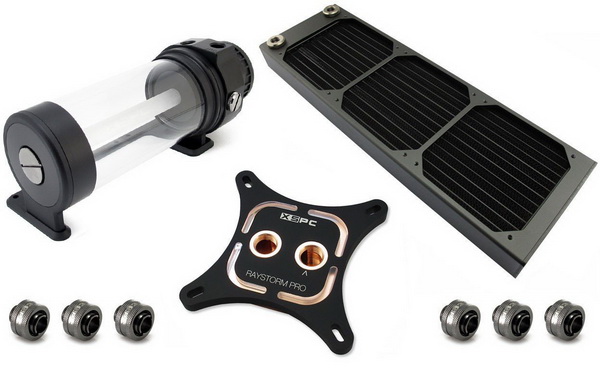
As the name clearly states the Raystorm Pro X4 Photon AX360 kit is based on the AX360 triple fan radiator which XSPC has paired with three 120mm Pro fans, their latest X4 Photon 170 Reservoir/Pump Combo and the RayStorm Pro copper waterblock. The AX360 radiator is actually one of the best models in the XSPC lineup not only due to its length (406mm long) but also because of its 3mm thick aluminum frame and its core which is made out of brass and copper. XSPC also initially offered this kit with their Ion Pump/Reservoir combo but it was soon replaced when they released the higher capacity and performance X4 Photon 170 Reservoir/Pump model (85ml capacity with 420lph maximum flow and 2 meter head delivery for the Ion versus 410ml capacity with 600lph maximum flow and 3 meter head delivery for the X4 Photon). Moving to the RayStorm Pro waterblock thanks to its aluminum frame and main copper body (top/base/channels) it's XSPC's top model currently (worth pointing out is that aside using a top section made out of copper it also features a total of 56 copper channels compared to the 48 of its predecessor). Finally the three Pro 120mm fans the kit comes with may not feature any LEDs (unlike the brand new RGB models by XSPC) are high static pressure models designed specifically for high FPI PC radiators (1650RPM/65.2CFM/1.8mmH2O/29dBA). So judging by its components the RayStorm Pro X4 Photon AX360 Kit seems to be a very interesting high performance water cooling loop so let's move forward with our review and see just what consumers can expect from it.
SPECIFICATIONS AND FEATURES
PACKAGING AND CONTENTS
We received the kit inside a plain cardboard box (media sample) that has nothing on the outside (we opened it thinking the regular box was placed inside but that wasn't the case).
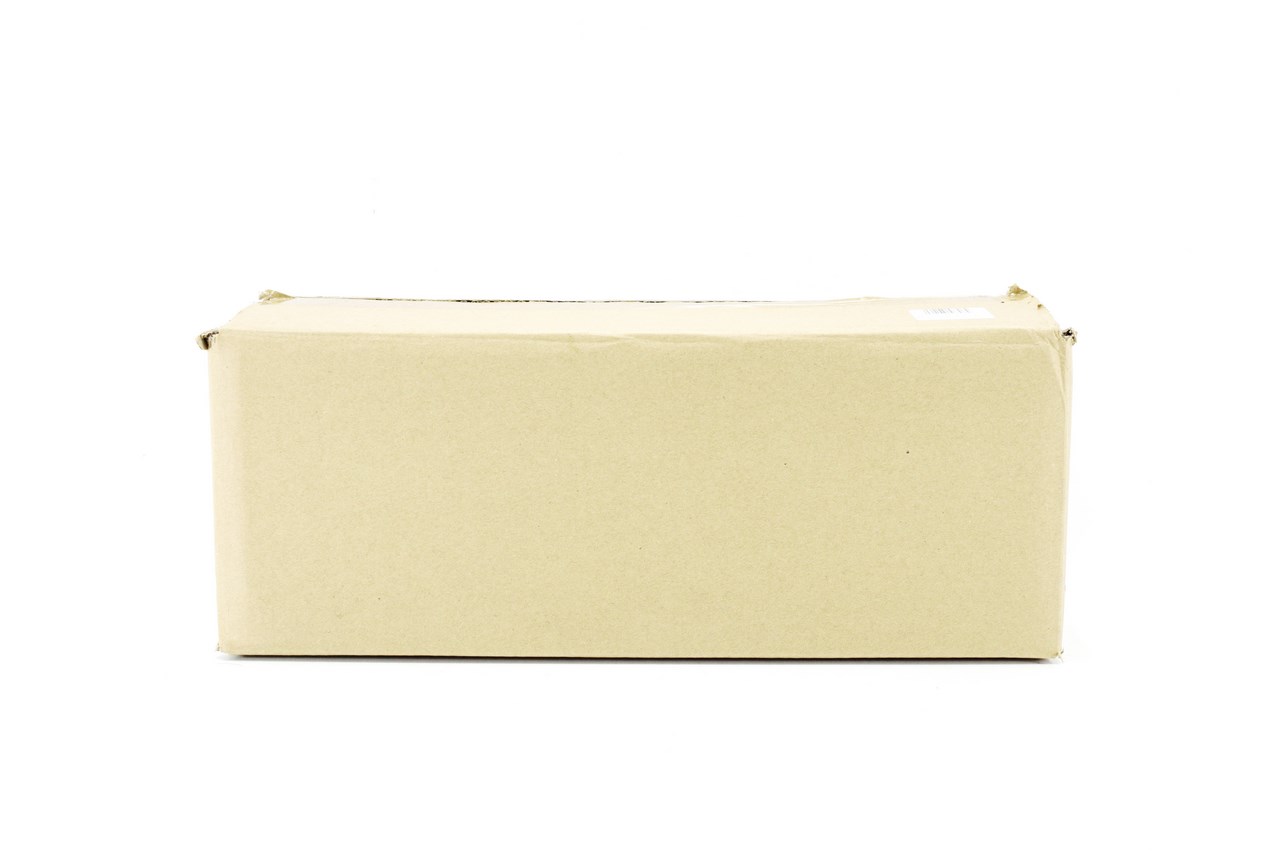
The good news is that every component inside (minus the fans and the tubing) was packed inside its original box.
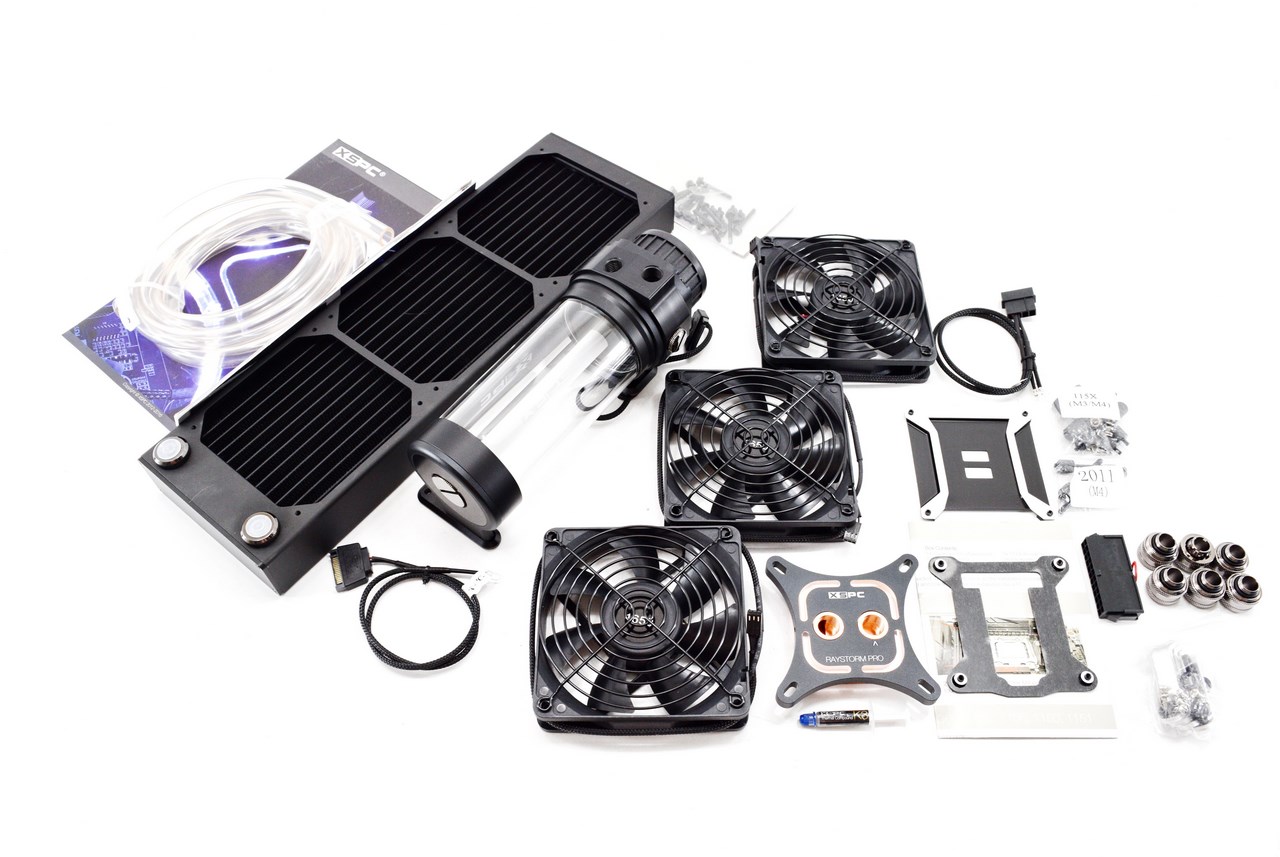
Contained inside the box were the AX360 radiator with its 6/30mm 6-32 UNC mounting screws, 3 pro series 120mm fans with their metal grills, X4 Photon 170 Reservoir with its mounting screws and 5mm white LED (and the 24pin ATX bridge tool), two meter long clear HighFlex Hose, installation instructions, 6 chrome fittings and finally the RayStorm Pro waterblock with its two white LEDs, Allen key, K3 thermal paste tube and all the necessary hardware needed to mount it on Intel LGA1150/1151/1155/1156/1366/2011/2011-3/2066 compatible mainboards (there's also an AMD version of this kit available).
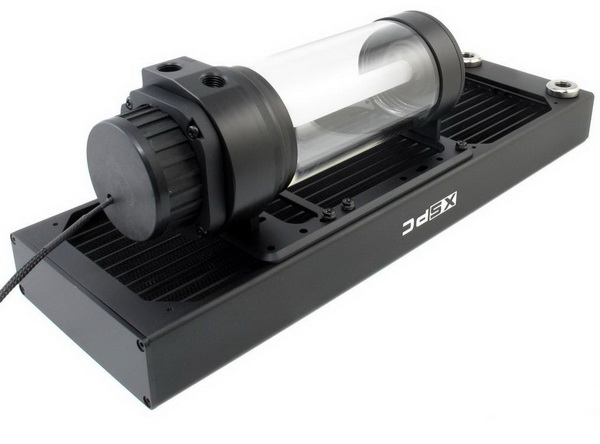
THE RAYSTORM PRO X4 PHOTON AX360
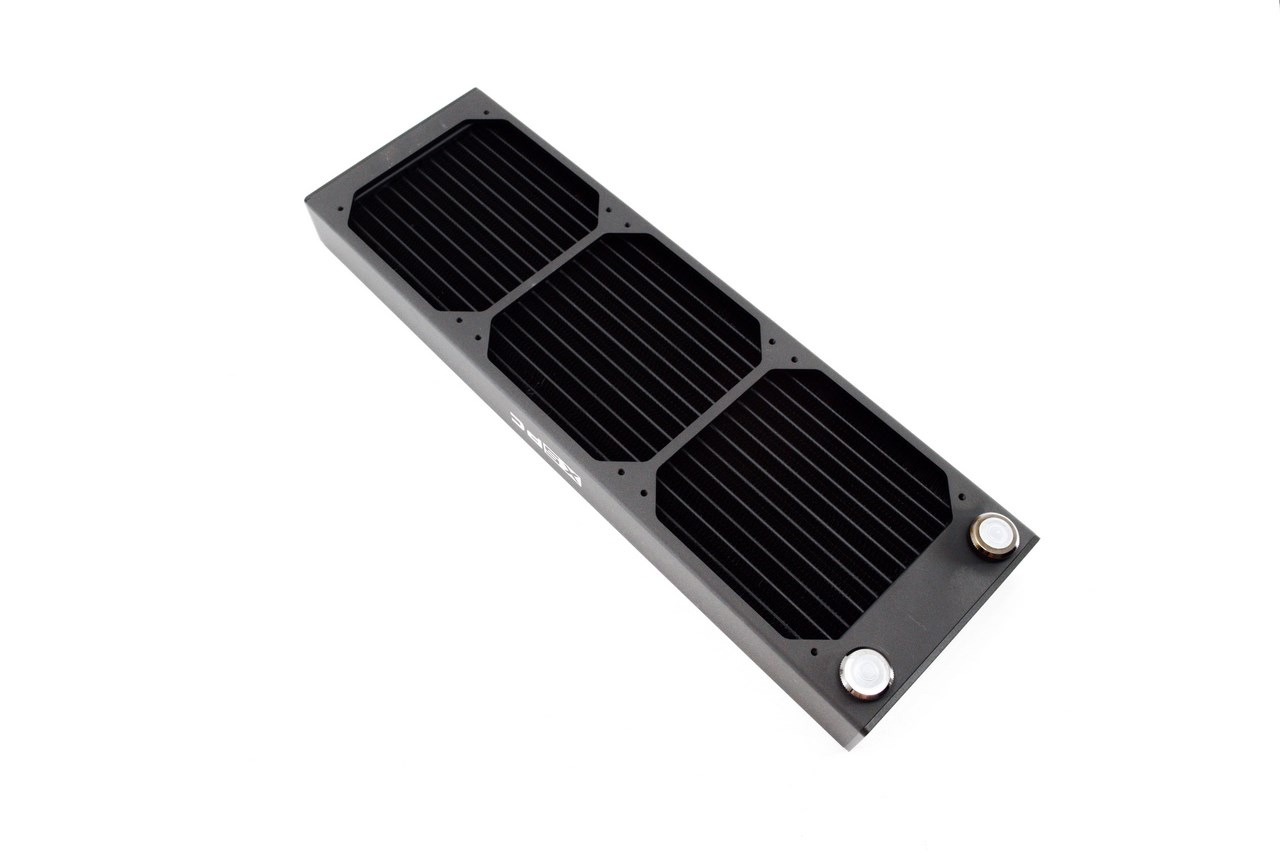
The high build quality of the 406mm long, 128mm wide and 40mm thick AX360 is very easy to notice even just by looking or holding the radiator.
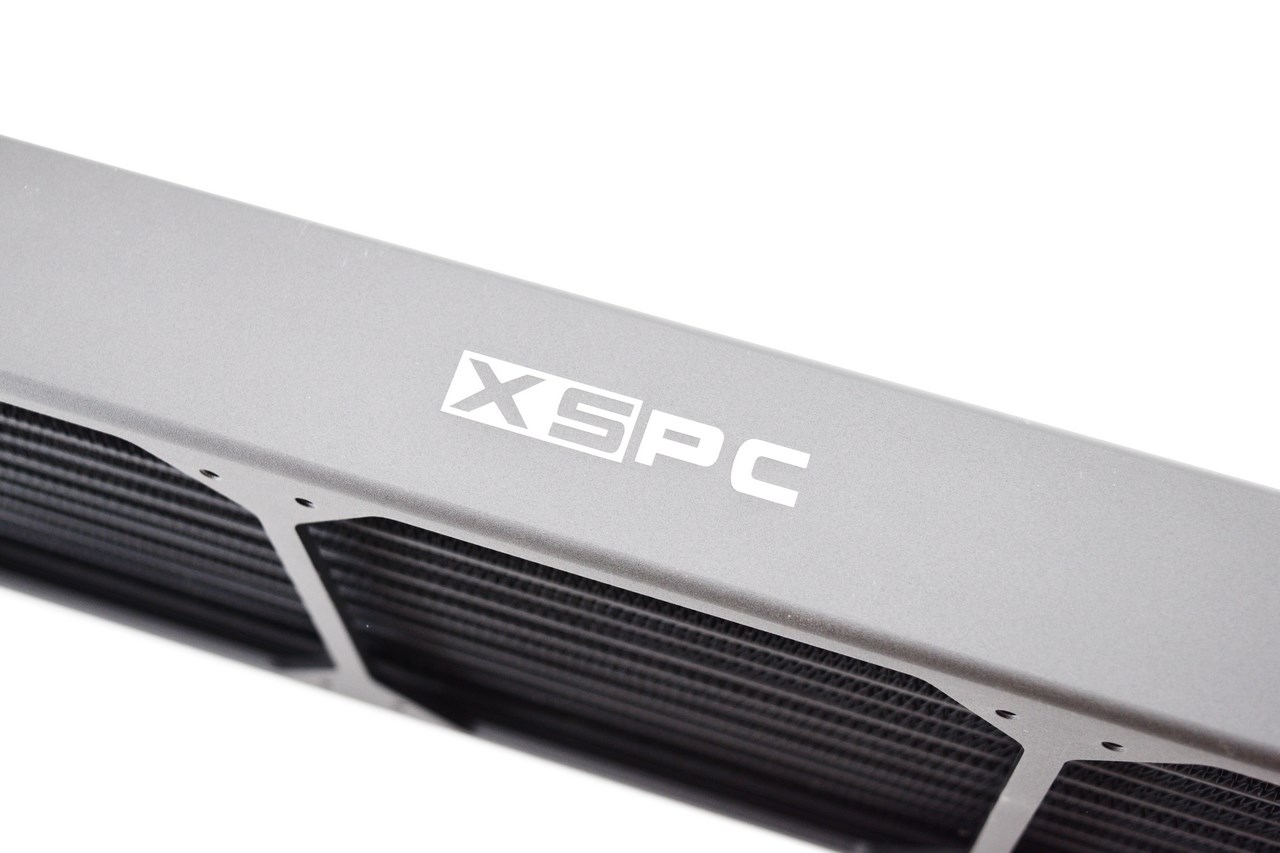
The XSPC logo is placed on both sides of the frame.
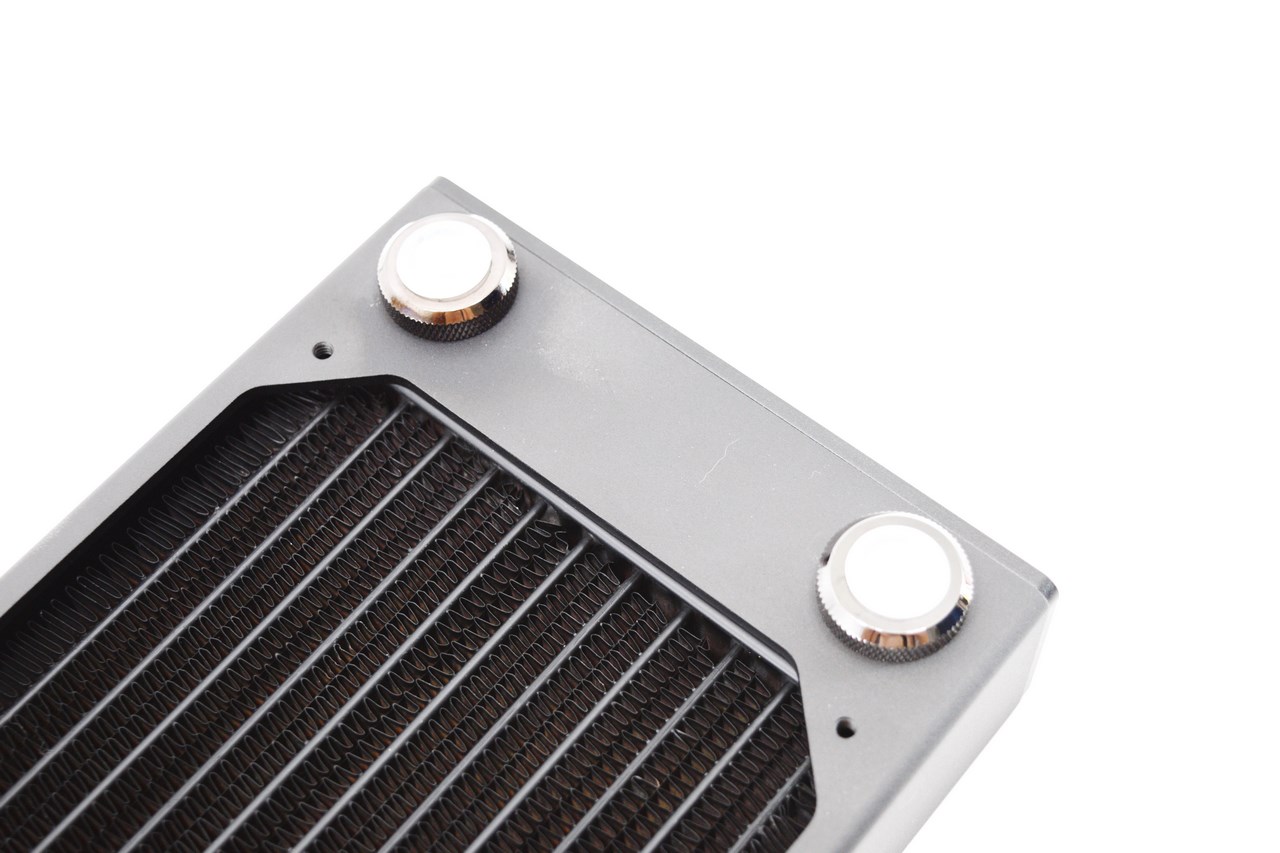
Compared to other models we've seen in the past again by XSPC that have a total of three ports the AX360 has just two chrome plated G1/4" ports at the top end as seen above.
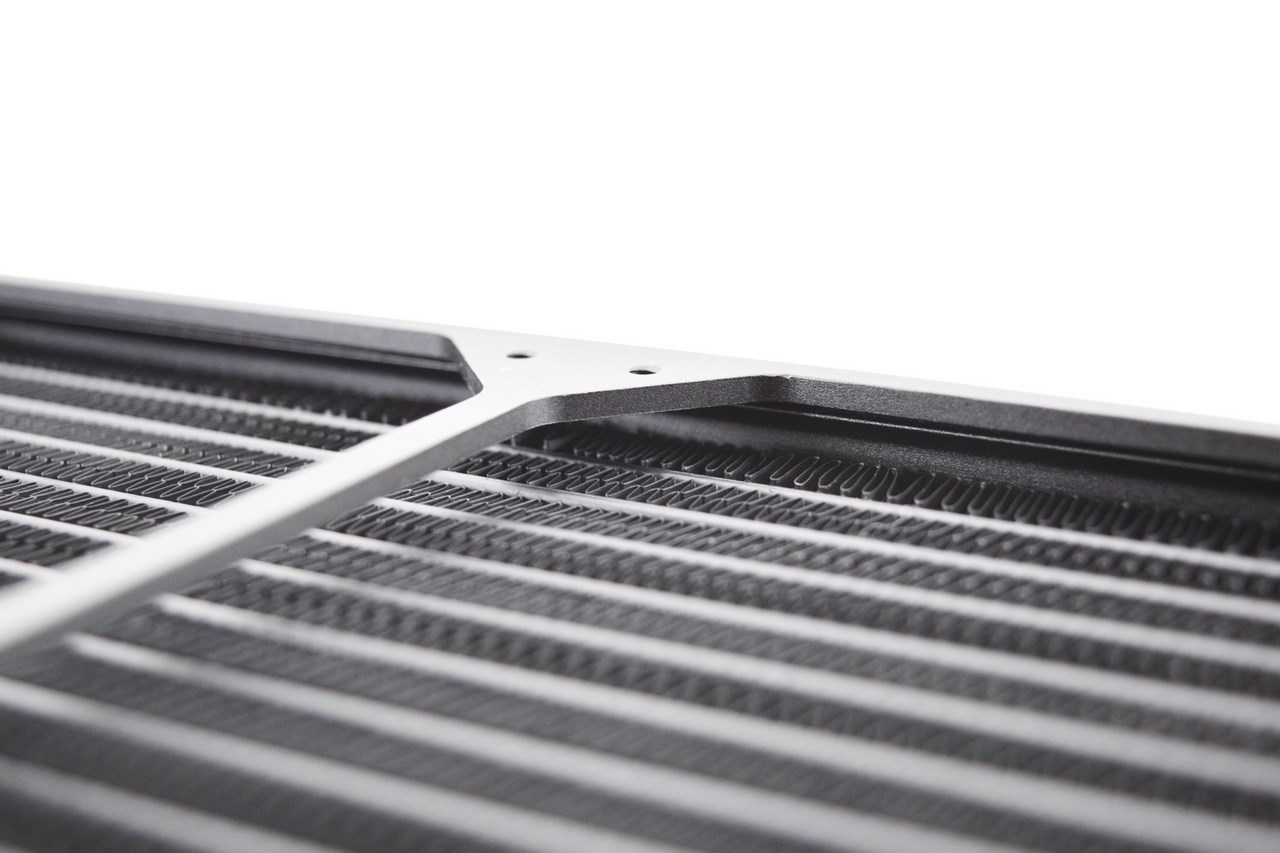
Unfortunately the radiator has no protection plates so you should pay extra attention while mounting it to avoid damaging its fins.
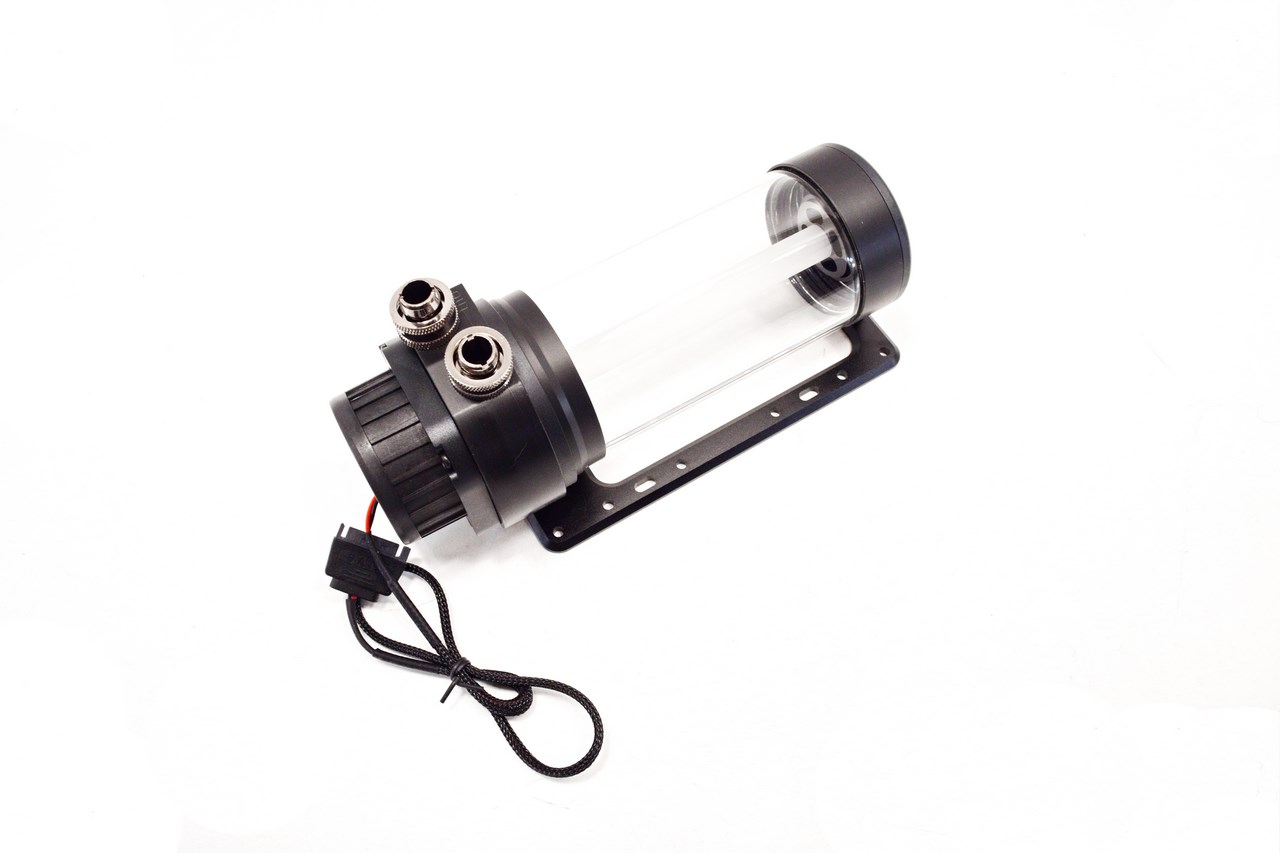
Due to its rather high liquid capacity of 410ml the X4 Photon 170 Reservoir/Pump combo measures no less than 227.6mm in length, 87mm in width and 92mm in height.
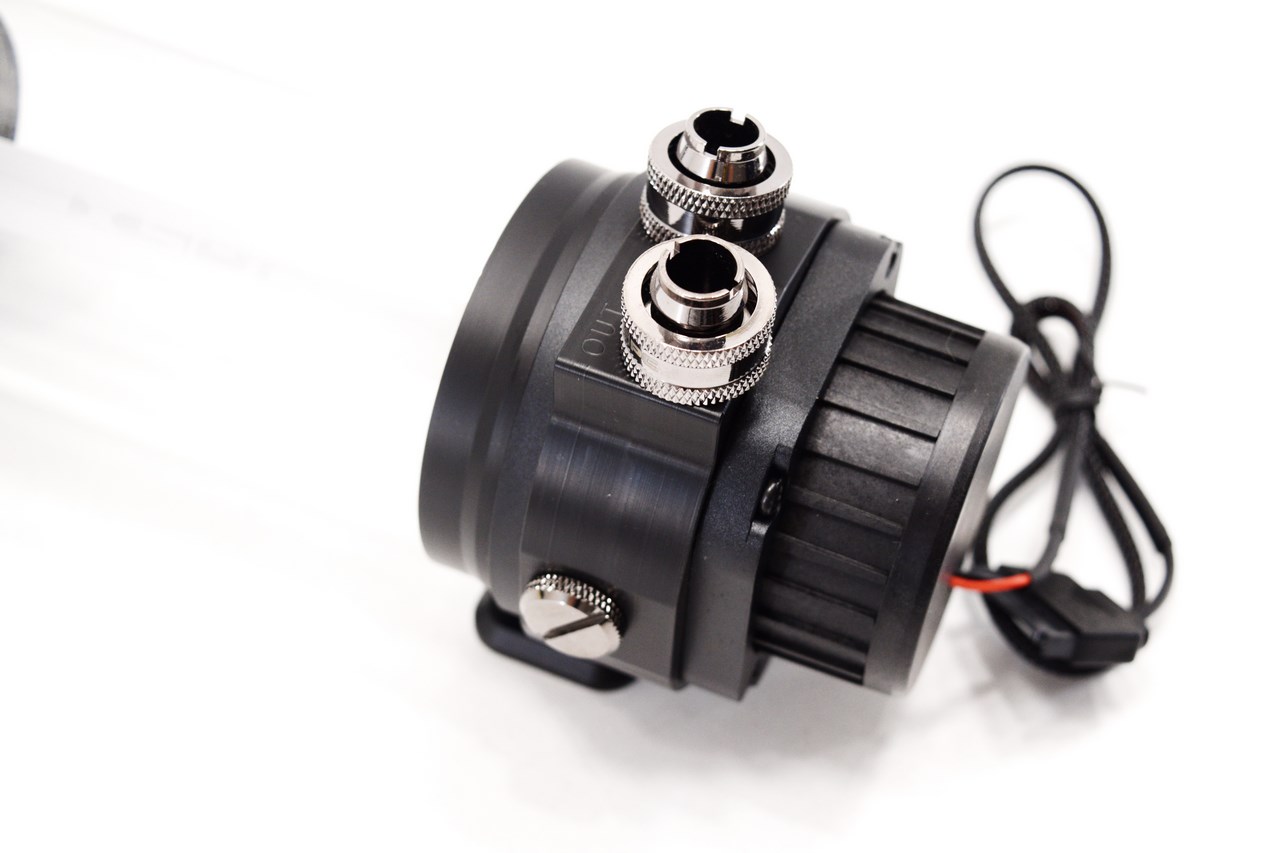
As you can all see the pump is located at the base of the reservoir (SATA power connector) and right above it we see 3 G1/4" ports.
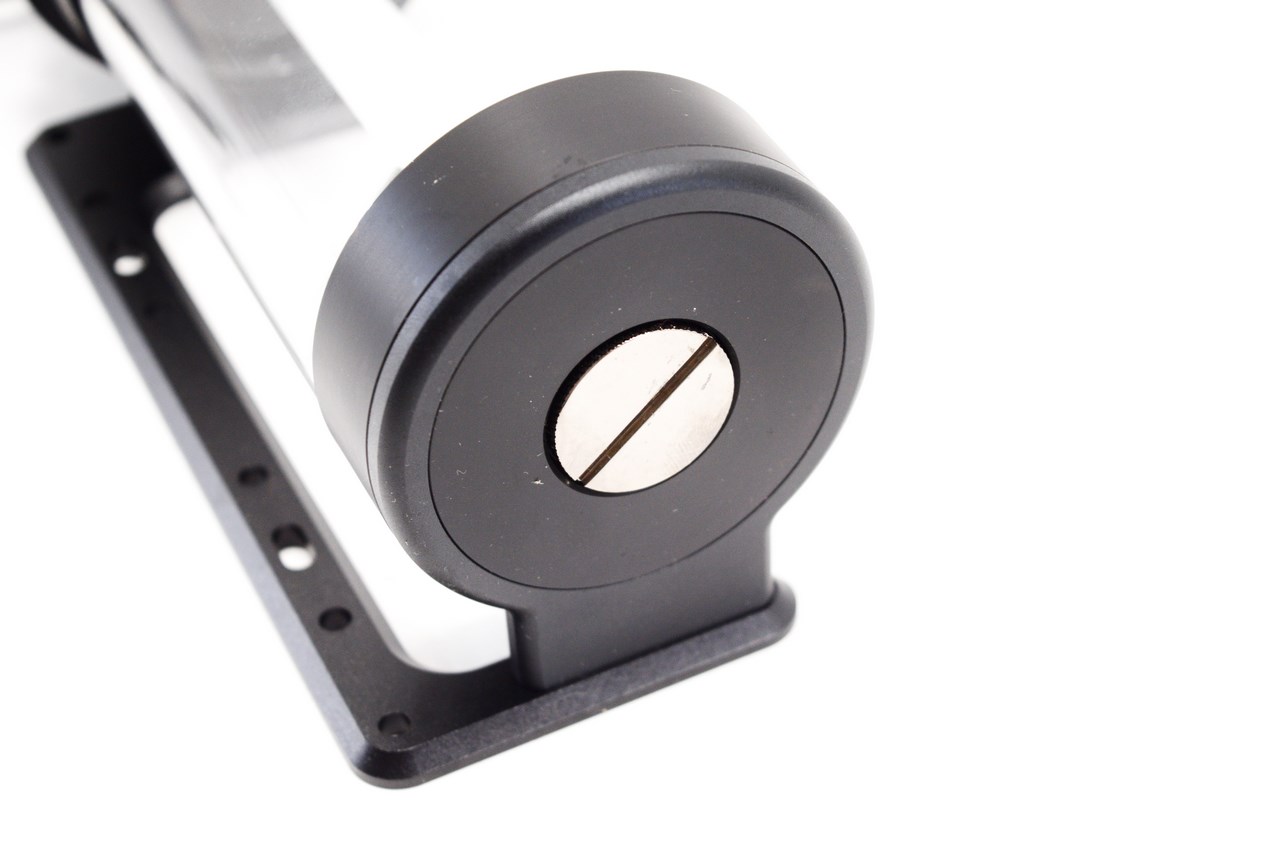
A large fill hole/port is placed at the top of the reservoir.
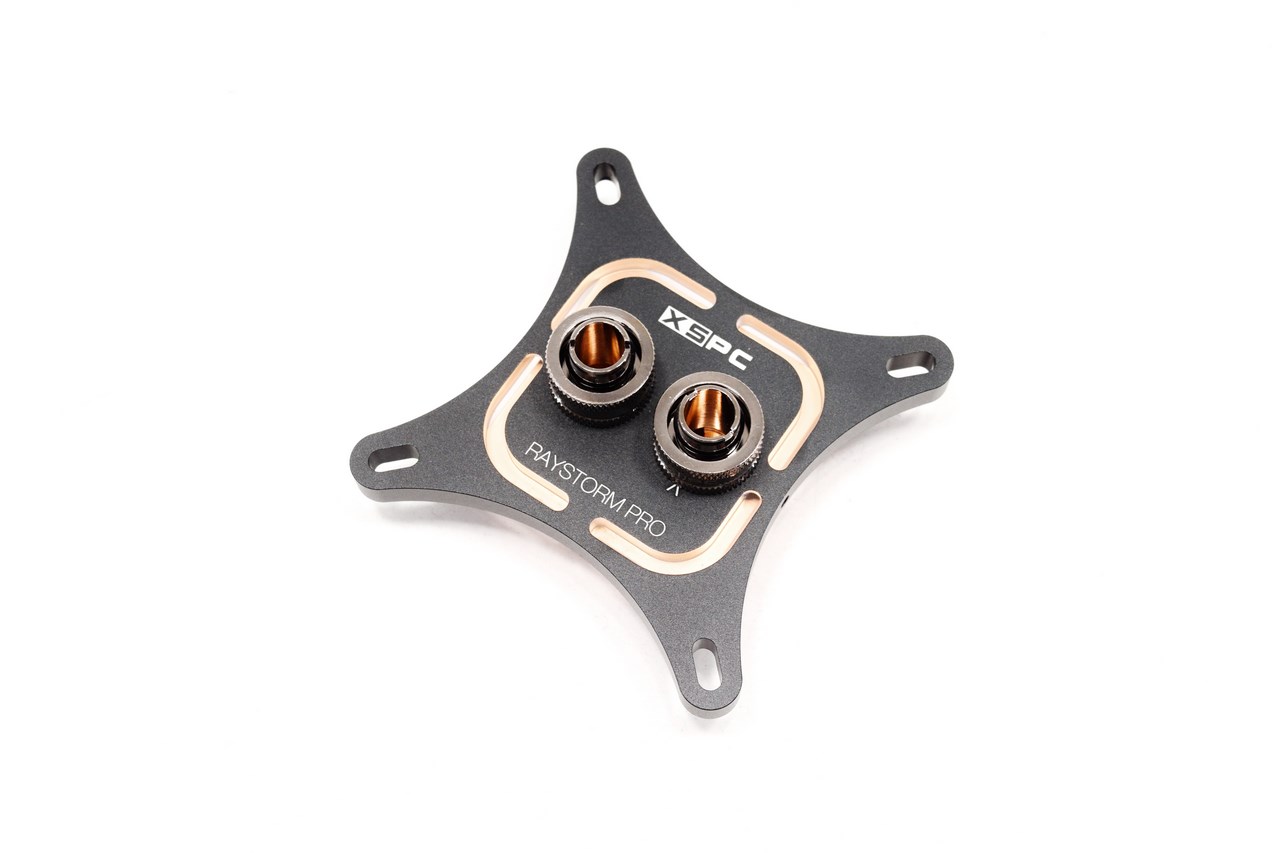
The RayStorm Pro waterblock consists by three parts the top aluminum bracket, acrylic inserts and the main copper body (center top/bottom).
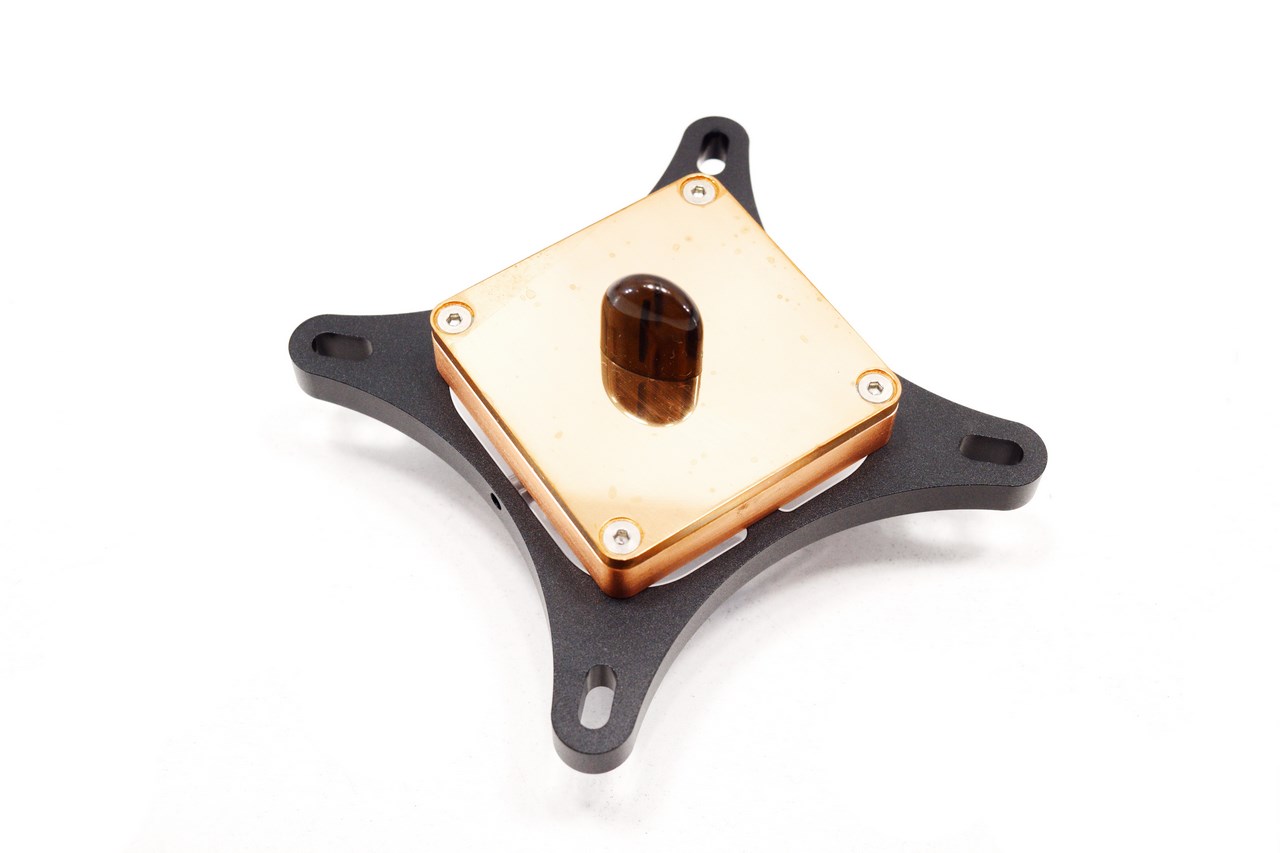
Its copper base has several machine marks on it while the two holes placed on both sides (here you can see one) are where you put the two white LEDs.
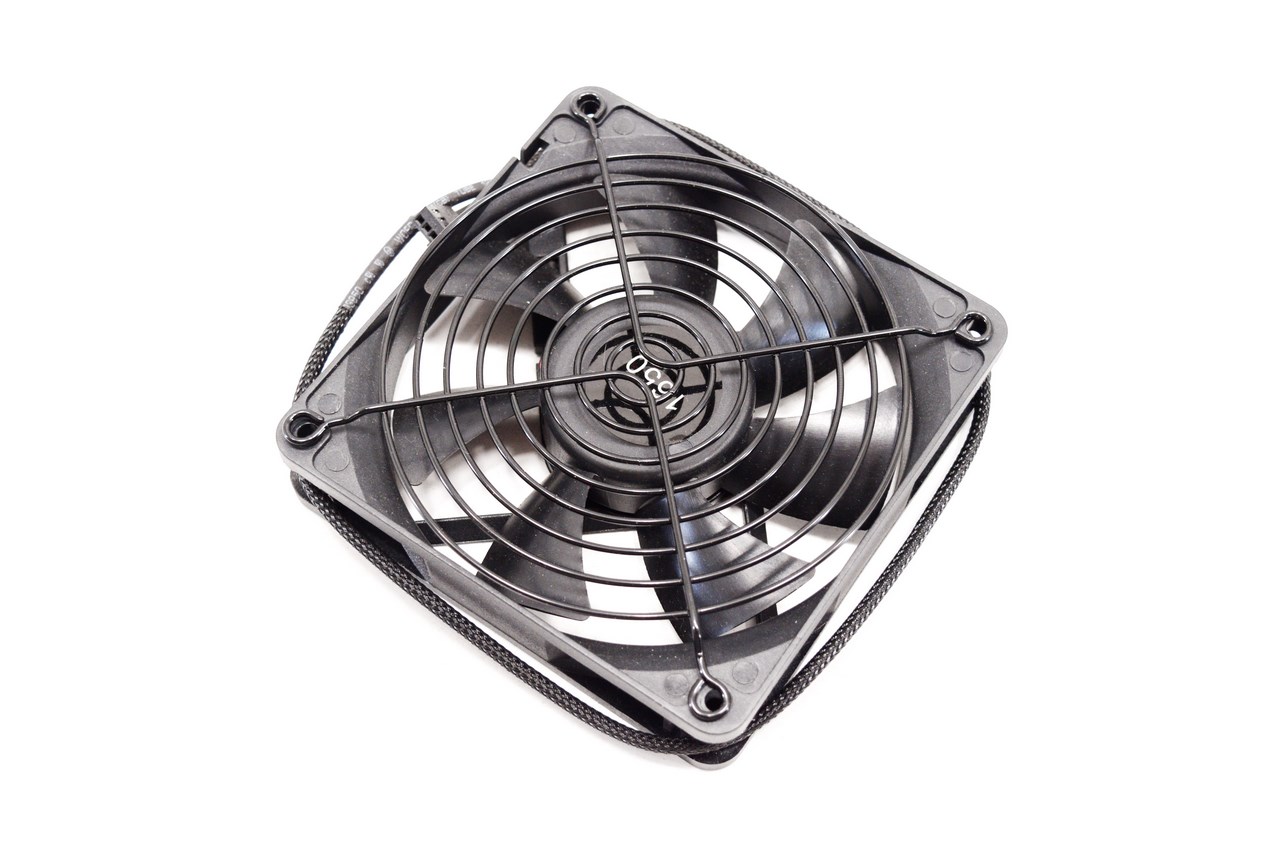
The three Pro 120mm fans may not be something special in terms of design but they come with their own metal grills and can reach speeds of up to 1650RPM (+-10%) to produce up to 65.2CFM of airflow and 1.8mmH2O of static pressure with just 29dBA of noise.
INSTALLATION - FINISHED LOOKS
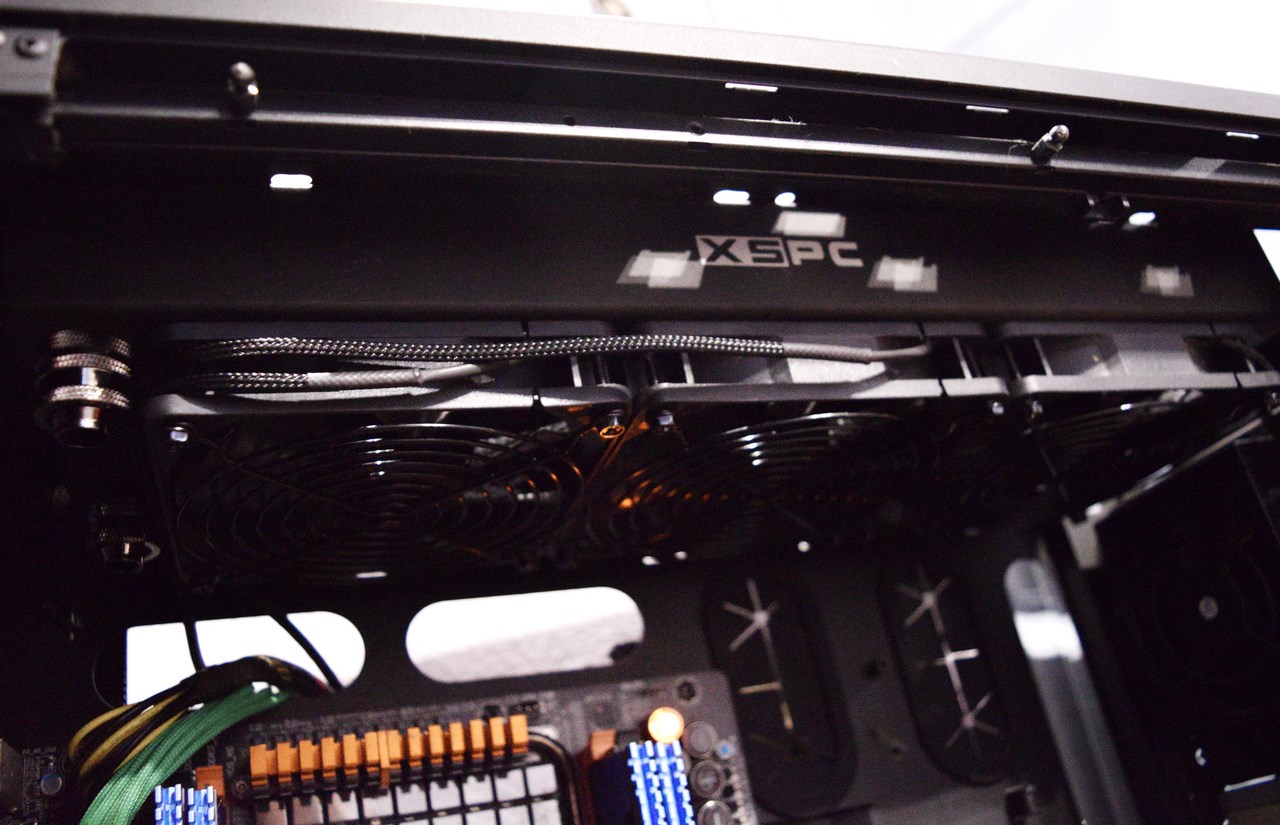
By mounting the three Pro 120mm fans onto the AX360 radiator you now need at least 65mm of space at the top/front of your tower (not much of a challenge for the Obsidian 900D since need be you could easily mount the fans on top of the radiator and the X4 Photon 170 reservoir/pump on the bottom).
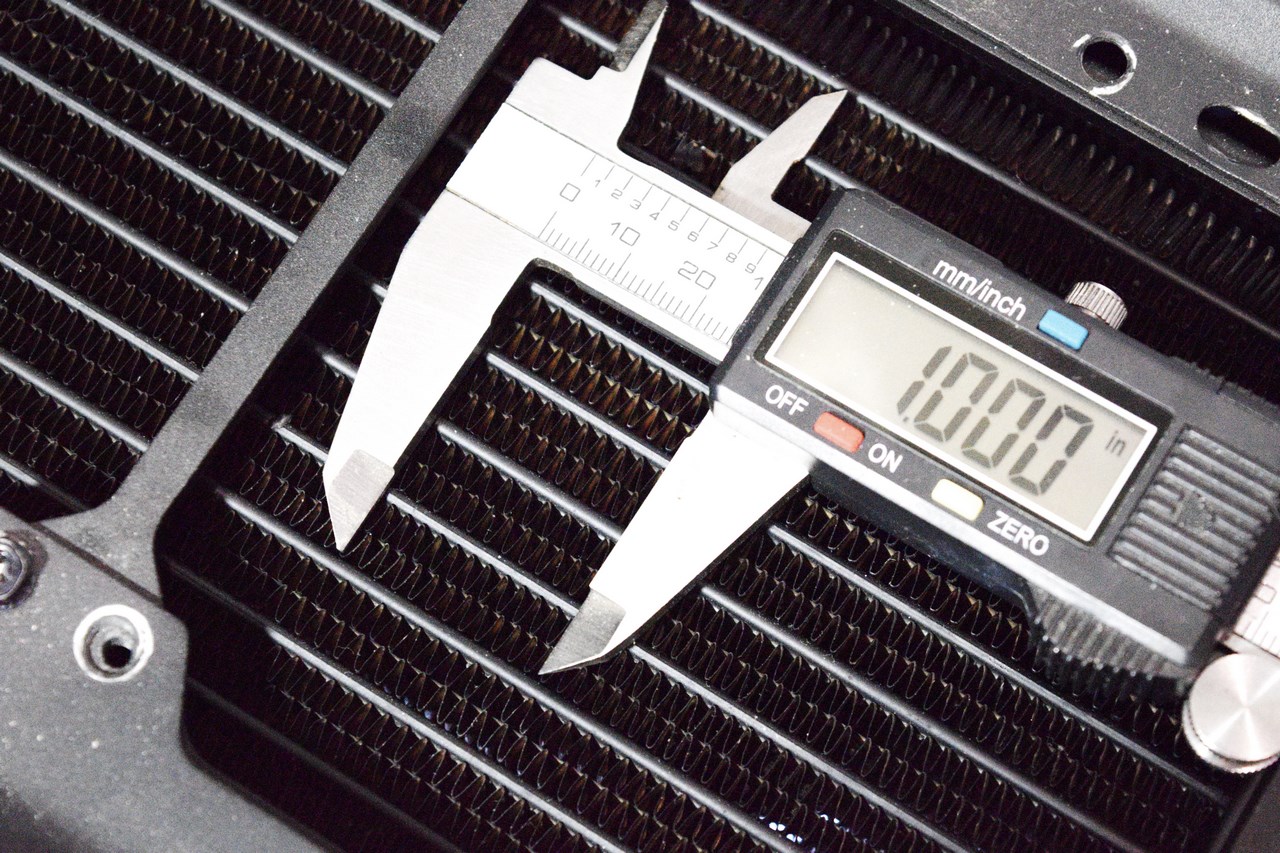
We forgot to do a fin count prior to mounting the radiator so here it is, the AX360 has roughly a total of 23 fins per inch (if you're wondering why we avoid taking pictures of installed kits it's clearly because unlike our photo bench the main lab lacks the lighting needed to do a proper job).
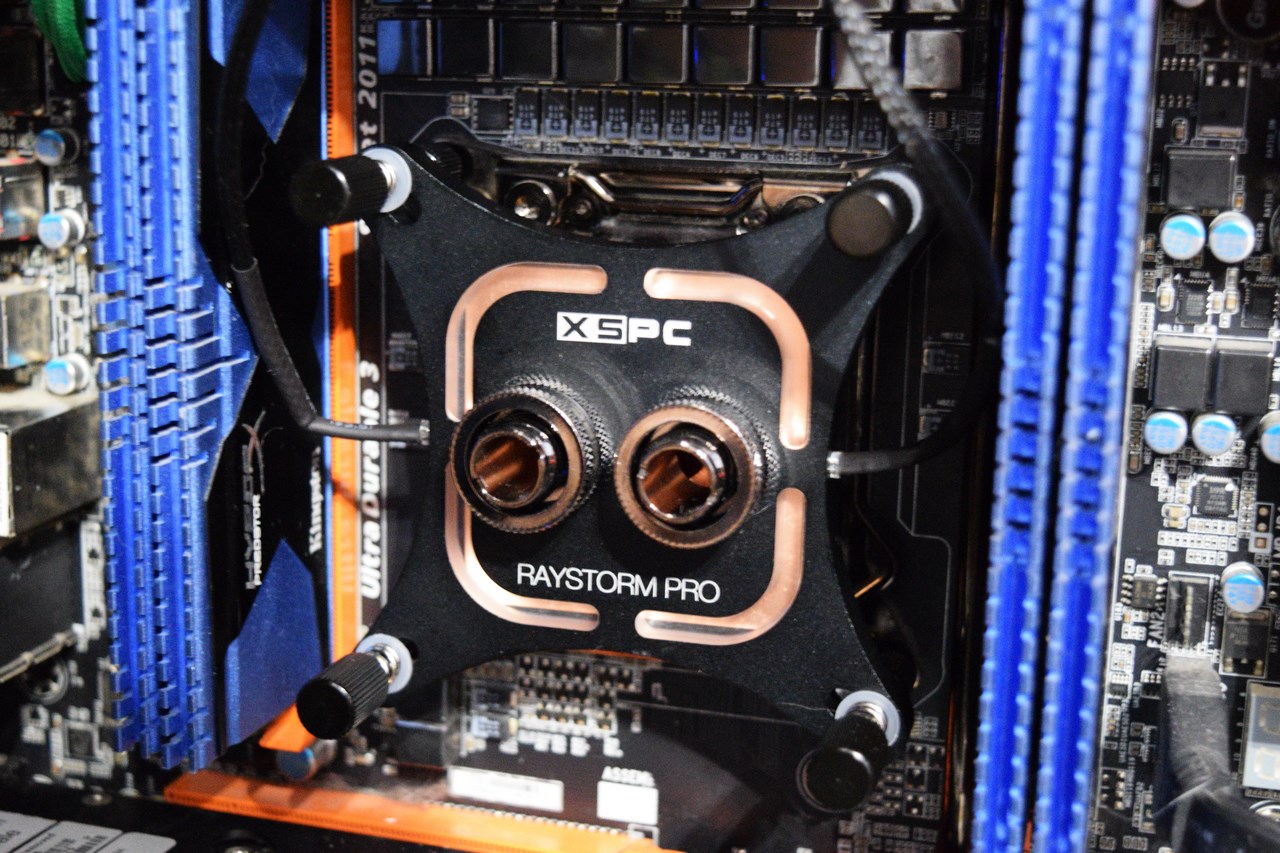
Next is the RayStorm Pro waterblock which once again is extremely easy to install since you just need to mount the 4 bars, place the waterblock and secure it in place using the bundled thumbscrews.
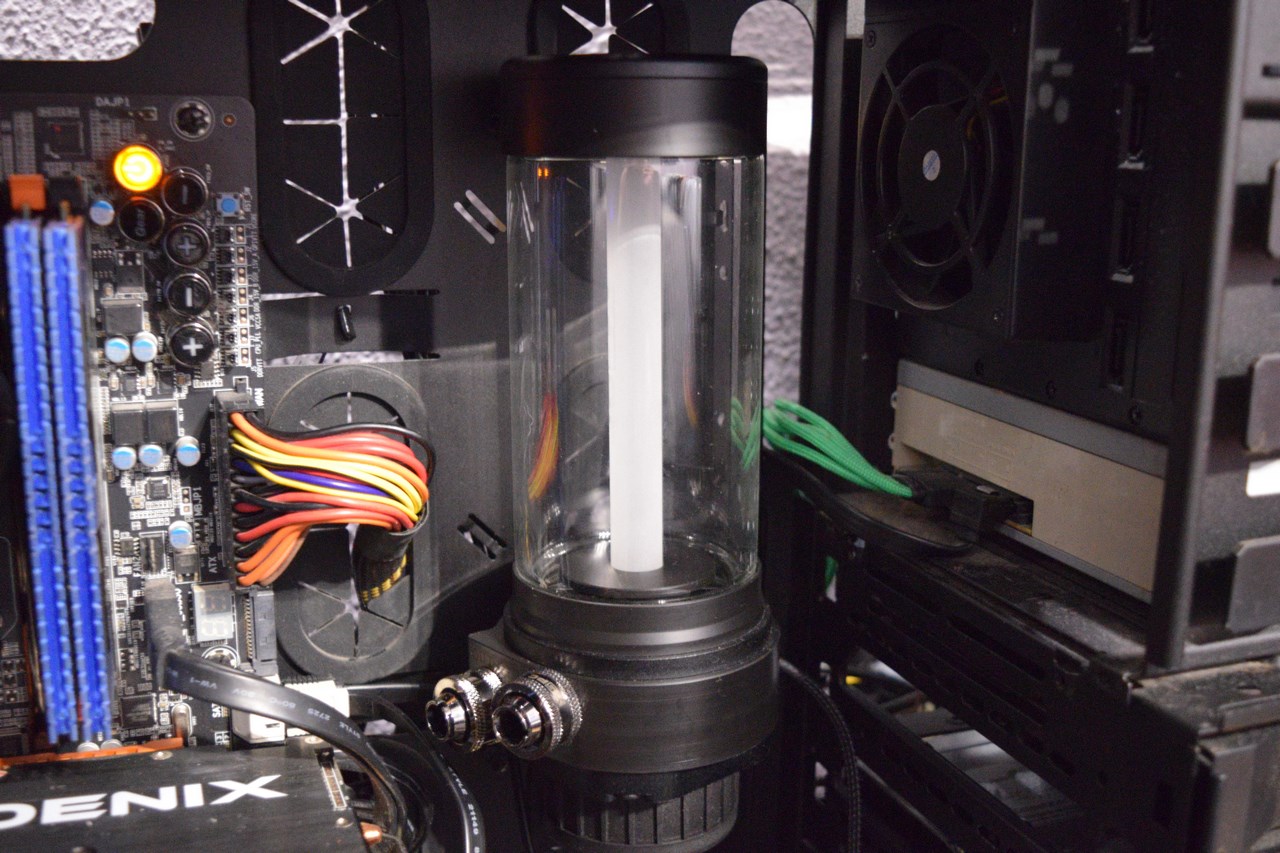
Mounting the X4 Photon 170 reservoir/pump combo can be done either vertically as in the above picture or horizontally (as mentioned already you can even attach it onto the AX360 radiator).
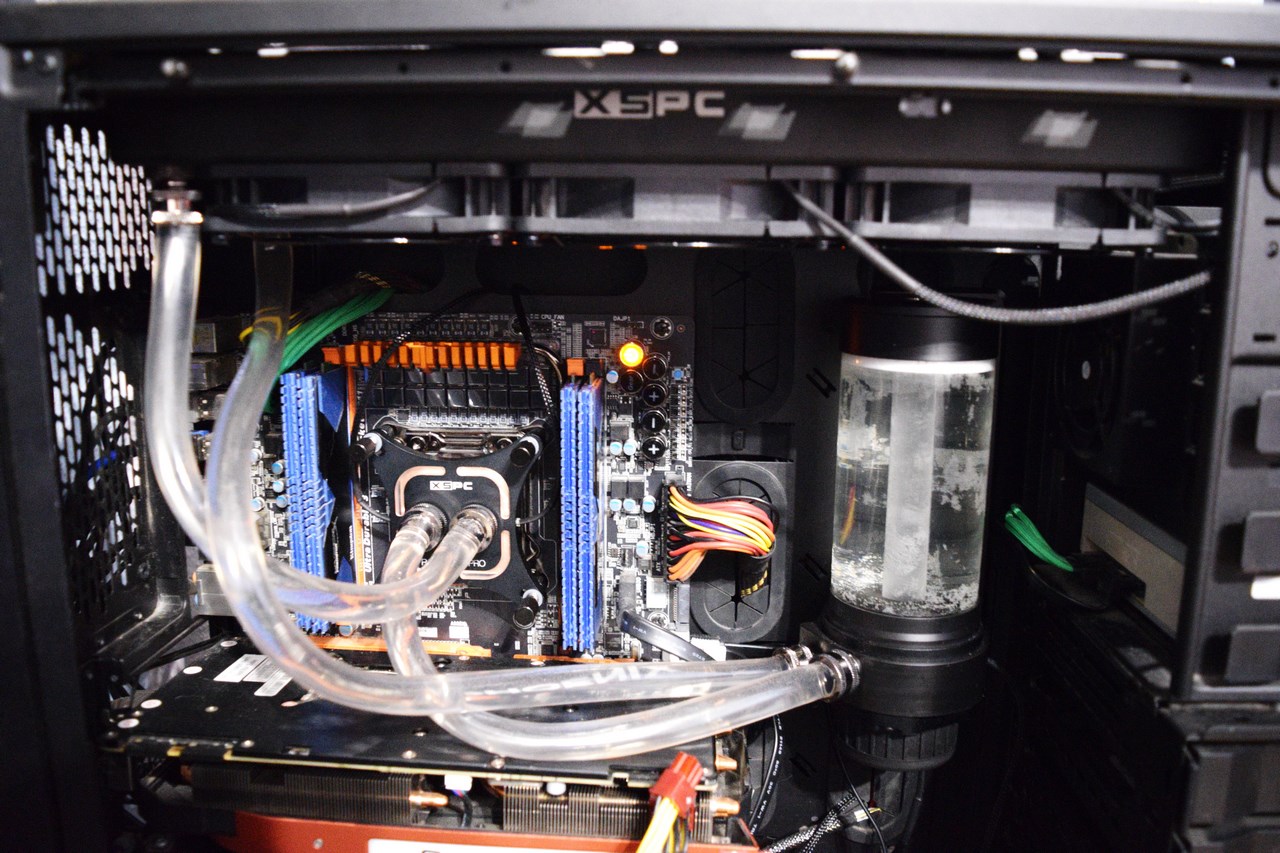
Cutting the bundled hose and attaching it to the fittings is the final step prior to filling the reservoir with liquid (it's always best if you test the kit with the reservoir/pump combo outside the tower to check for leaks - also unless you'd like to damage the pump never start it without liquid running through it).
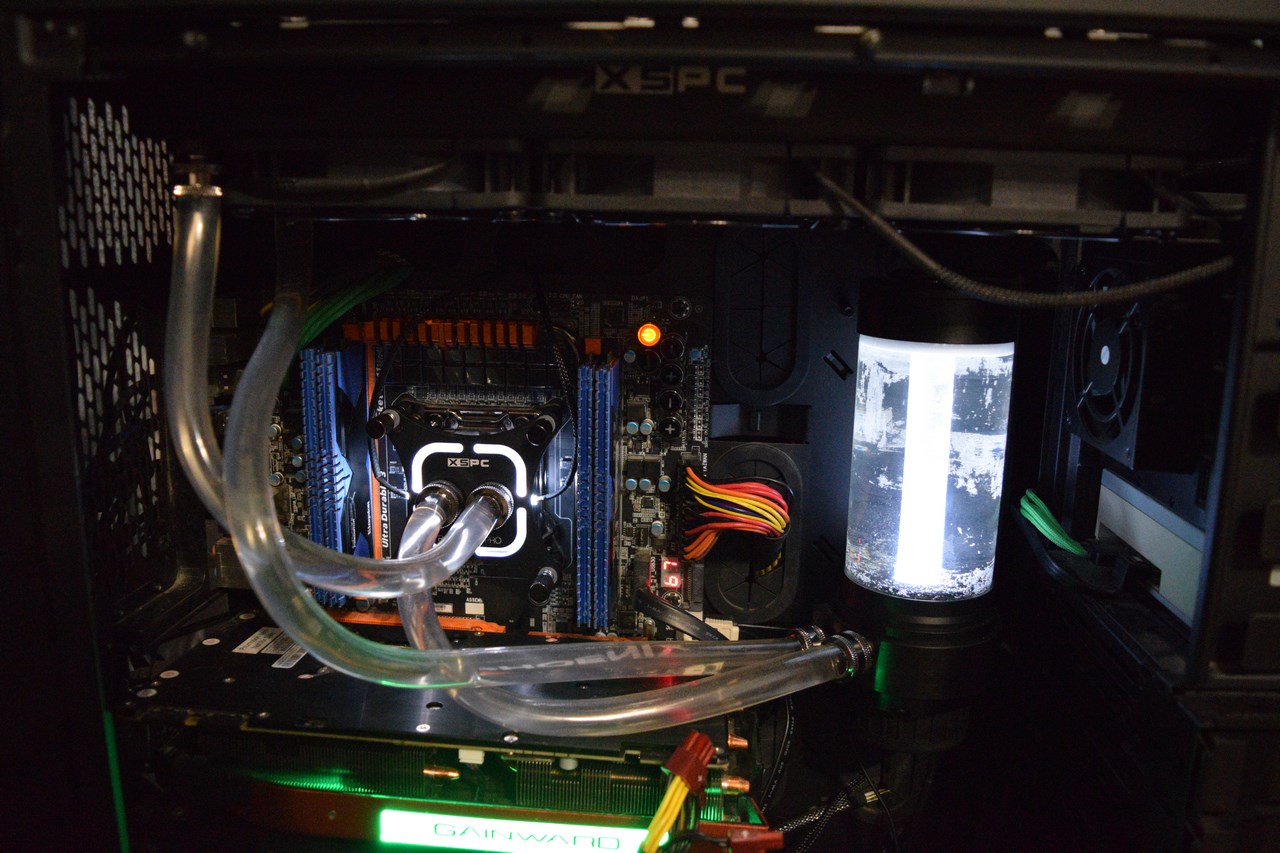
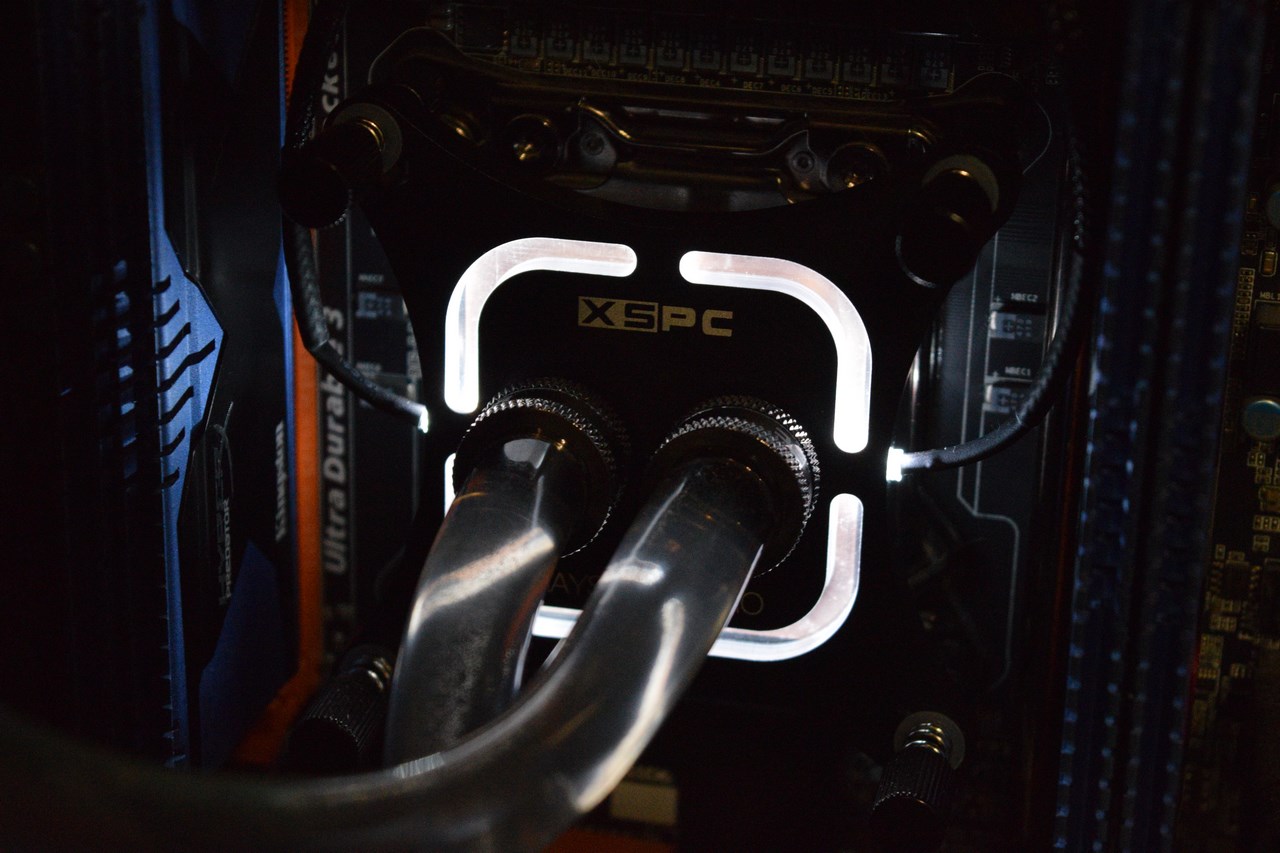
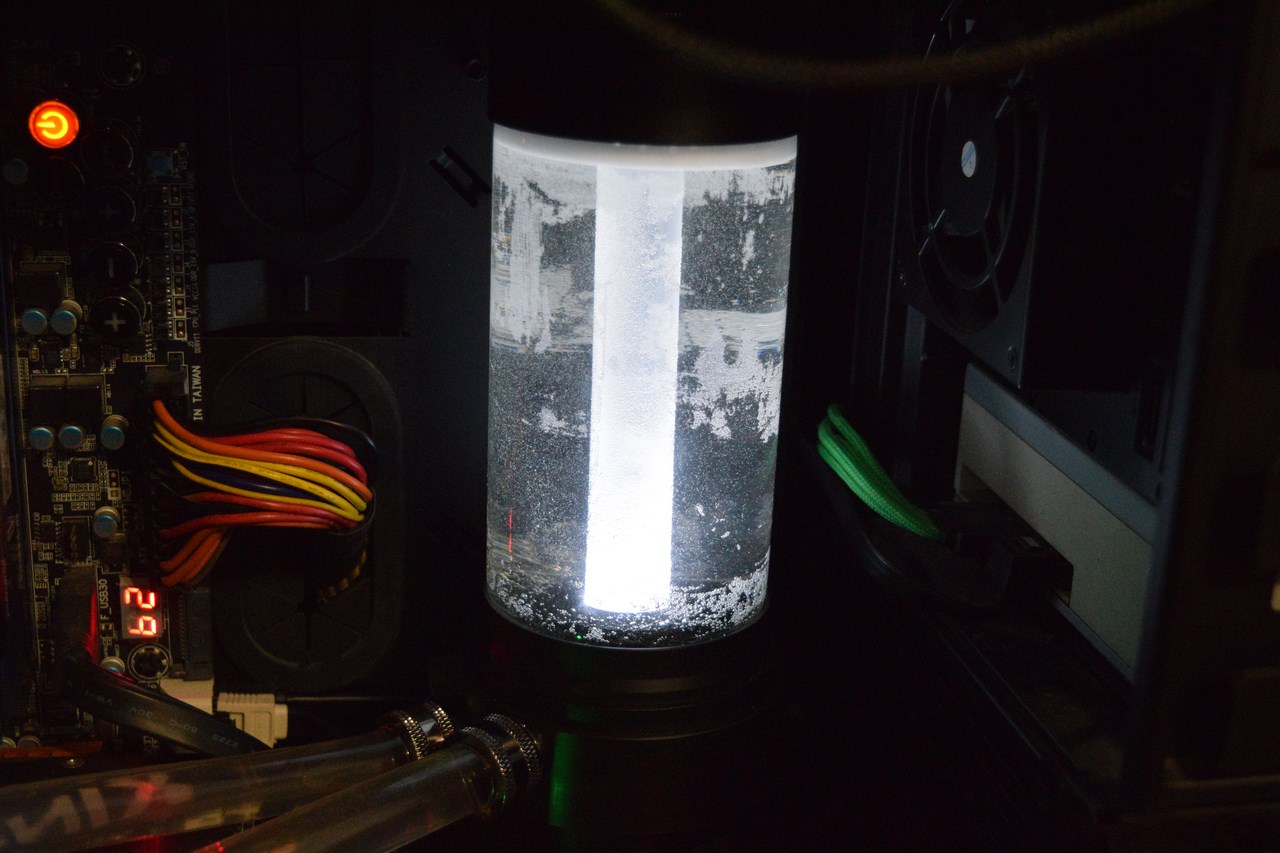
With a total of three white LEDs (two in the waterblock and one in the reservoir) the RayStorm Pro X4 Photon AX360 Kit looks very nice (would look even better with RGB LEDs - XSPC has already made that possible).
TEST BED
TESTING METHODOLOGY
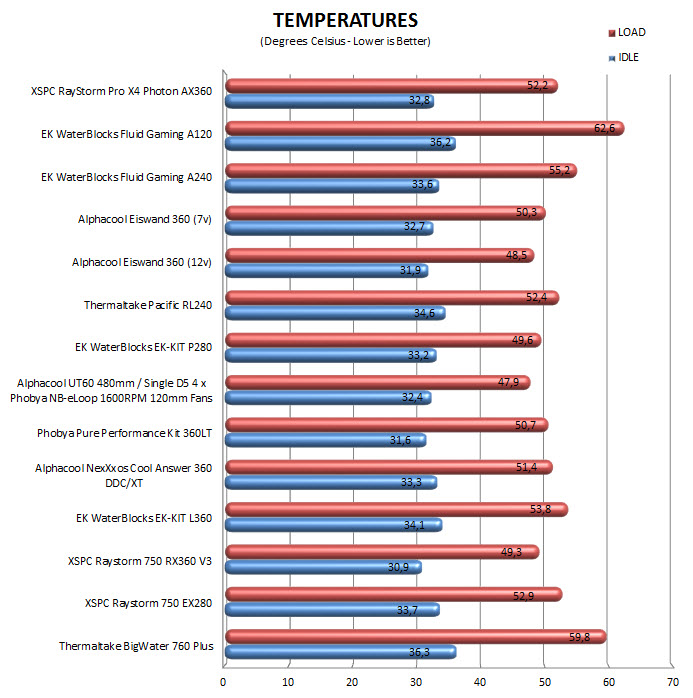
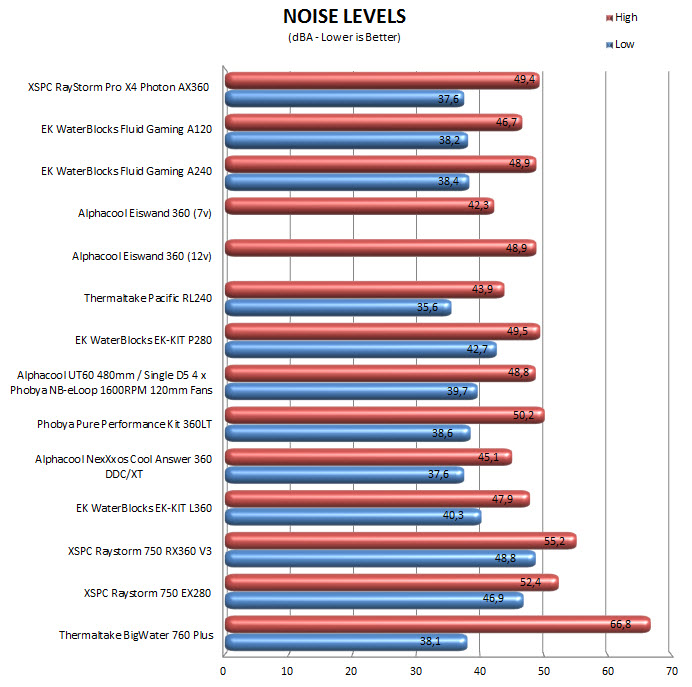
Testing complete water cooling kits or individual radiators is no different than testing CPU Coolers and since we want all of you to be able to compare similar products we created new and separate charts (you can still cross-compare results however since we are using the same test rig). So once again single (120/140mm) watercooling solutions are tested with the radiator mounted at the rear of our test rig while dual/triple/quad (240/260/280/360/420/480/560mm) solutions with the radiator mounted at the top. For the dBA tests complete water cooling kits or radiators with bundled fans are measured both while on idle mode or with the fan controller in the minimum setting and while on extreme load or with the fan controller all the way to the highest possible setting (PWM fans do that on their own without our intervention). Every single test takes place in a temperature controlled room of 23 degrees Celsius Ambient Temp with the help of two AC units placed diagonally inside the room. When testing complete water cooling kits we use the Arctic Silver 5 thermal paste. Finally much like when testing CPU Coolers it's very important to point out that just because a water cooling kit outperforms another when tested with our test rig (when we test complete water cooling kits) that does not necessarily mean that the same performance differences will apply 100% for other CPU models and in other situations (such as different ambient temps and system configurations).
To successfully record the load temperatures we use the latest OCCT application for around 6-10 minutes to push the processor to its limits and after that is done and the temperatures are recorded we wait for about 10-20 minutes for the CPU to cool down and record the idle temperatures. This is done to allow time for the thermal conductive material to achieve the optimal performance level. Same procedure is then repeated with the Passmark BurnIn Test as a failsafe just in case the OCCT results are wrong. This procedure takes a lot more time than the usual peltier/thermometer tests but this way not only can we deliver real world results to our readers based on real CPUs but we can also triple check the results using a variety of programs. Last but not least the temperatures were recorded using both the latest versions of AIDA64 and RealTemp while the noise level tests (when fans exist in the bundle) are performed using a high precision ExTech HD600 Decibel Meter placed about 10-15cm above the radiator. Still although the same testing procedure applies to all units do take into consideration that unlike the official numbers which are measured in special noise isolated labs with just the fans here we also have both the rest of the cooler and the rest of the system (although all system fans are turned off when recording noise levels).
TEST RESULTS
CONCLUSION
Transparency is something I’ve always liked so I feel I need to point out that the RayStorm Pro X4 Photon AX360 Kit by XSPC arrived many months ago but due to unforeseen circumstances (moving all our samples to another room and damaging the original Ion reservoir/pump in the process – which was then replaced with the X4 Photon model - were the two main reasons) it took this long for us to finish this review. With that out of the way it’s clear from our charts that although the RayStorm Pro X4 Photon AX360 Kit is far from the best kit to ever reach our lab still it’s made out of high quality parts which combined offer very good cooling efficiency with acceptable noise levels and good looks. Of course since we live in the RGB ERA the RayStorm Pro RGB waterblock and the new Pro RGB fans should be at the front and center of this kit but it actually arrived before these were officially released (we’ll do our best to get an custom loop from XSPC with those parts for our next review).
The two things which are largely responsible for the price of a complete watercooling kit like the RayStorm Pro X4 Photon AX360 by XSPC are the size of radiator used (single/dual/triple/quad) and the performance levels of the remaining parts such as the pump and waterblock. With that in mind since XSPC has combined some of their top components to create the RayStorm Pro X4 Photon AX360 Kit its price tag of USD276.95 inside the USA (Amazon.com) and 239Euros inside the EU (Amazon.co.uk) feels justified. Bottom line the XSPC RayStorm Pro X4 Photon AX360 Watercooling Kit represents a solid investment for people looking to efficiently cool their systems and since it performs as advertised (and looks nice in the process) it is well worth of our Golden Award.

PROS
- Top Build Quality
- Very Good Cooling Performance
- Inaudible Pump
- X4 Photon 170 Tube Reservoir (410ml Capacity / High Performance Pump)
- 3x120mm Pro Fans
- 2 Meter Long Tubing Included
- Easy Installation
- Finished Looks
CONS
- Price (For Some)
- No Coolant Included
- AMD or Intel Kits